If you want to research, build, and launch your products fast, this is the solo founder stack for AI-native apps, zero-to-launch weekends, and practically infinite leverage.
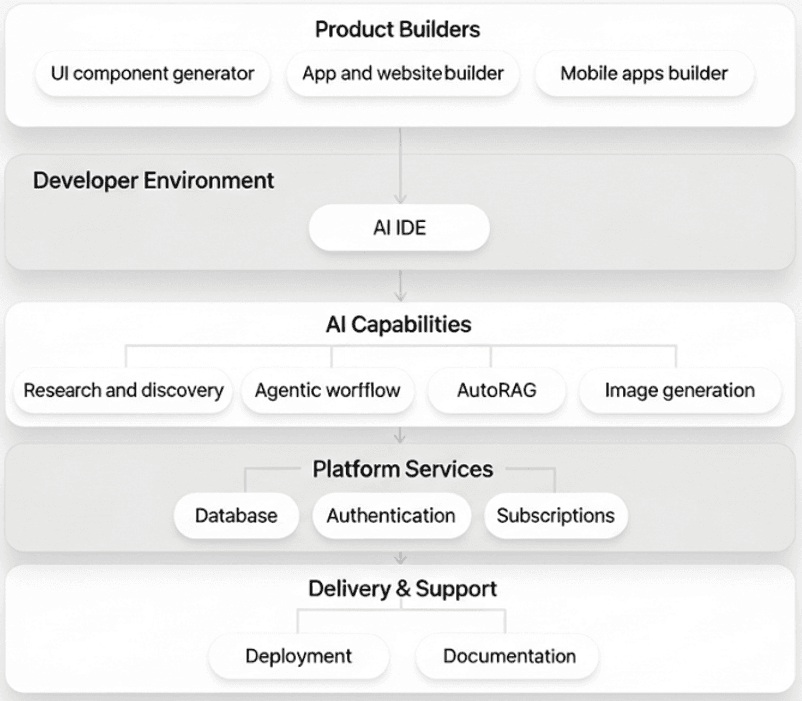
In this guide, I’ll walk you through the exact tools solo founders and indie hackers are quietly using to move faster than teams of dozens in 2026, from AI coding assistants and UI generators to no-code scaffolds and lightning-fast deployments.
By the end, you’ll know how to turn an idea into a working SaaS, AI tool, or mobile app without touching AWS, hiring anyone, or losing momentum.
Let’s dive into VIBESTACK!
Step 1: Research & Discovery with Perplexity
Every great product starts with validation.
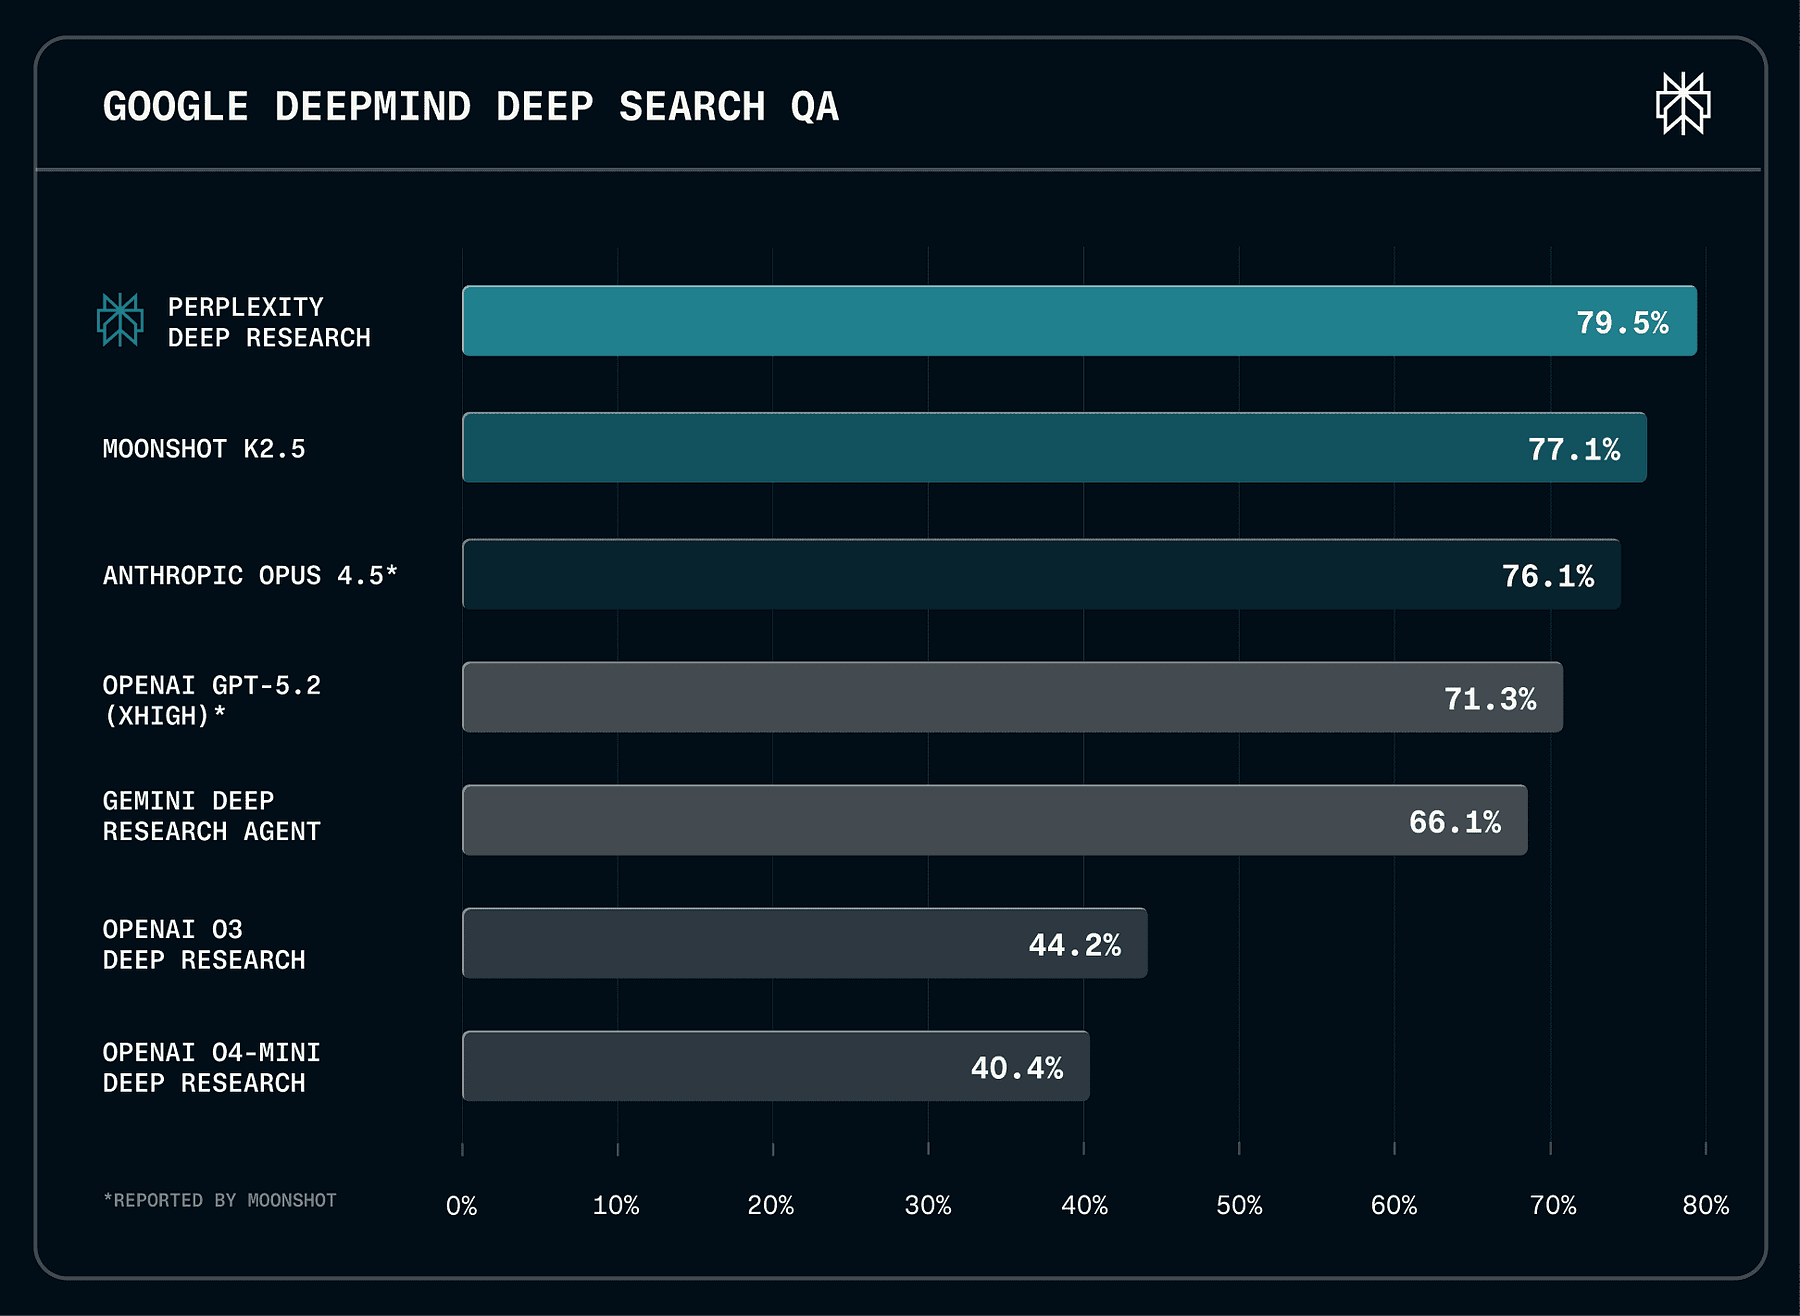
Perplexity is your personal research assistant that can search the web and summarize answers with cited sources.
It’s currently state-of-the-art performance on leading external benchmarks, including Google DeepMind’s DeepSearchQA.
Instead of manually googling for hours, you can ask Perplexity questions like “What features do users want in a habit-tracking app?” or “Who are the top competitors in AI note-taking tools?” and get concise answers with references.
This is your online information retrieval system that uses LLMs to search and summarize web content, and it provides accurate, trusted, and real-time answers with sources, acting as a conversational assistant.
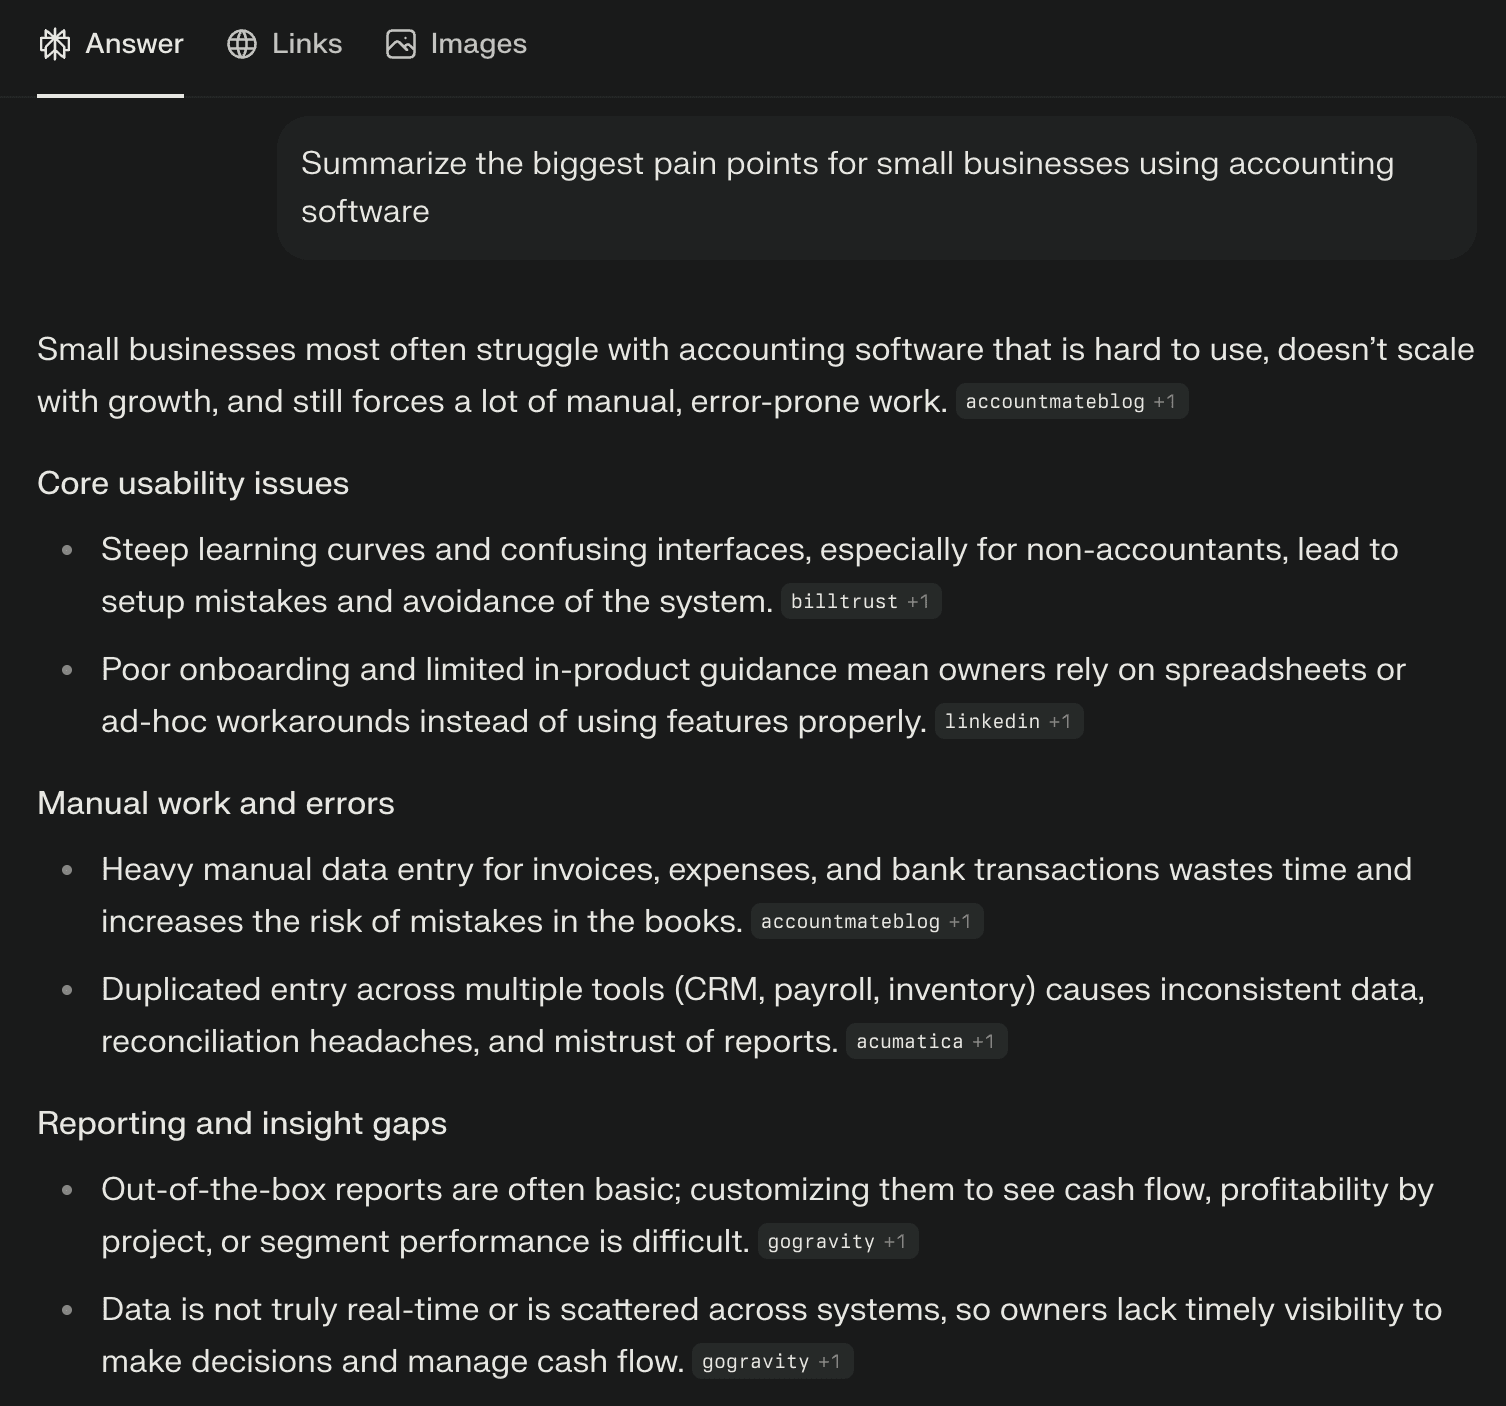
For example, if you’re brainstorming a SaaS idea, you might prompt Perplexity: “Summarize the biggest pain points for small businesses using accounting software.”
You’ll get a summary of pain points (like cost, complexity, lack of integration, etc.), with links to articles or forums where those were mentioned.
AI research dramatically cuts down the time to get up to speed on a domain.
As a developer-founder, you can discover market needs, relevant technologies, and even code snippets or algorithms through Perplexity in minutes.
Example: Suppose you want to create a micro-tool that visualizes CSV data in interesting ways. You ask Perplexity, “What are some existing CSV visualization tools and what do users say about them?” Perplexity might return a summary noting that users find existing tools hard to use for large files, and citing forums or blog posts. Now you’ve discovered a potential competitive edge (handling large files easily) and maybe even got ideas for implementation from cited sources, all in one step. That’s the power of AI-assisted discovery.
Step 2: Designing the UI with Vercel v0
With your idea in hand, the next step is prototyping the user interface.
Traditionally, you’d wireframe or design mockups, then code the UI, but with v0 by Vercel, you can collapse these steps into one.
v0 is an AI-powered UI component generator that makes website and app UI creation as simple as describing your ideas.
It’s essentially a generative UI tool: you type what you want, and it produces production-ready React/Tailwind components for you.
How v0 works:
- Describe the interface you want to build. For instance: “A login form with email and password fields, and a big Sign In button, styled like a modern SaaS app.”
- v0 generates the code using popular open-source libraries like React, Tailwind CSS, and Shadcn UI and gives you multiple iterations to preview.
- You can refine it within v0’s editor by providing more instructions or tweaking settings (e.g., “make the button blue and larger” or “add a remember me checkbox”).
- When satisfied, you copy-paste the code into your project.
Vercel calls this approach “Generative UI”, combining best practices of frontend dev with generative AI. It basically means you skip the blank-screen coding; v0 writes the initial code for you.
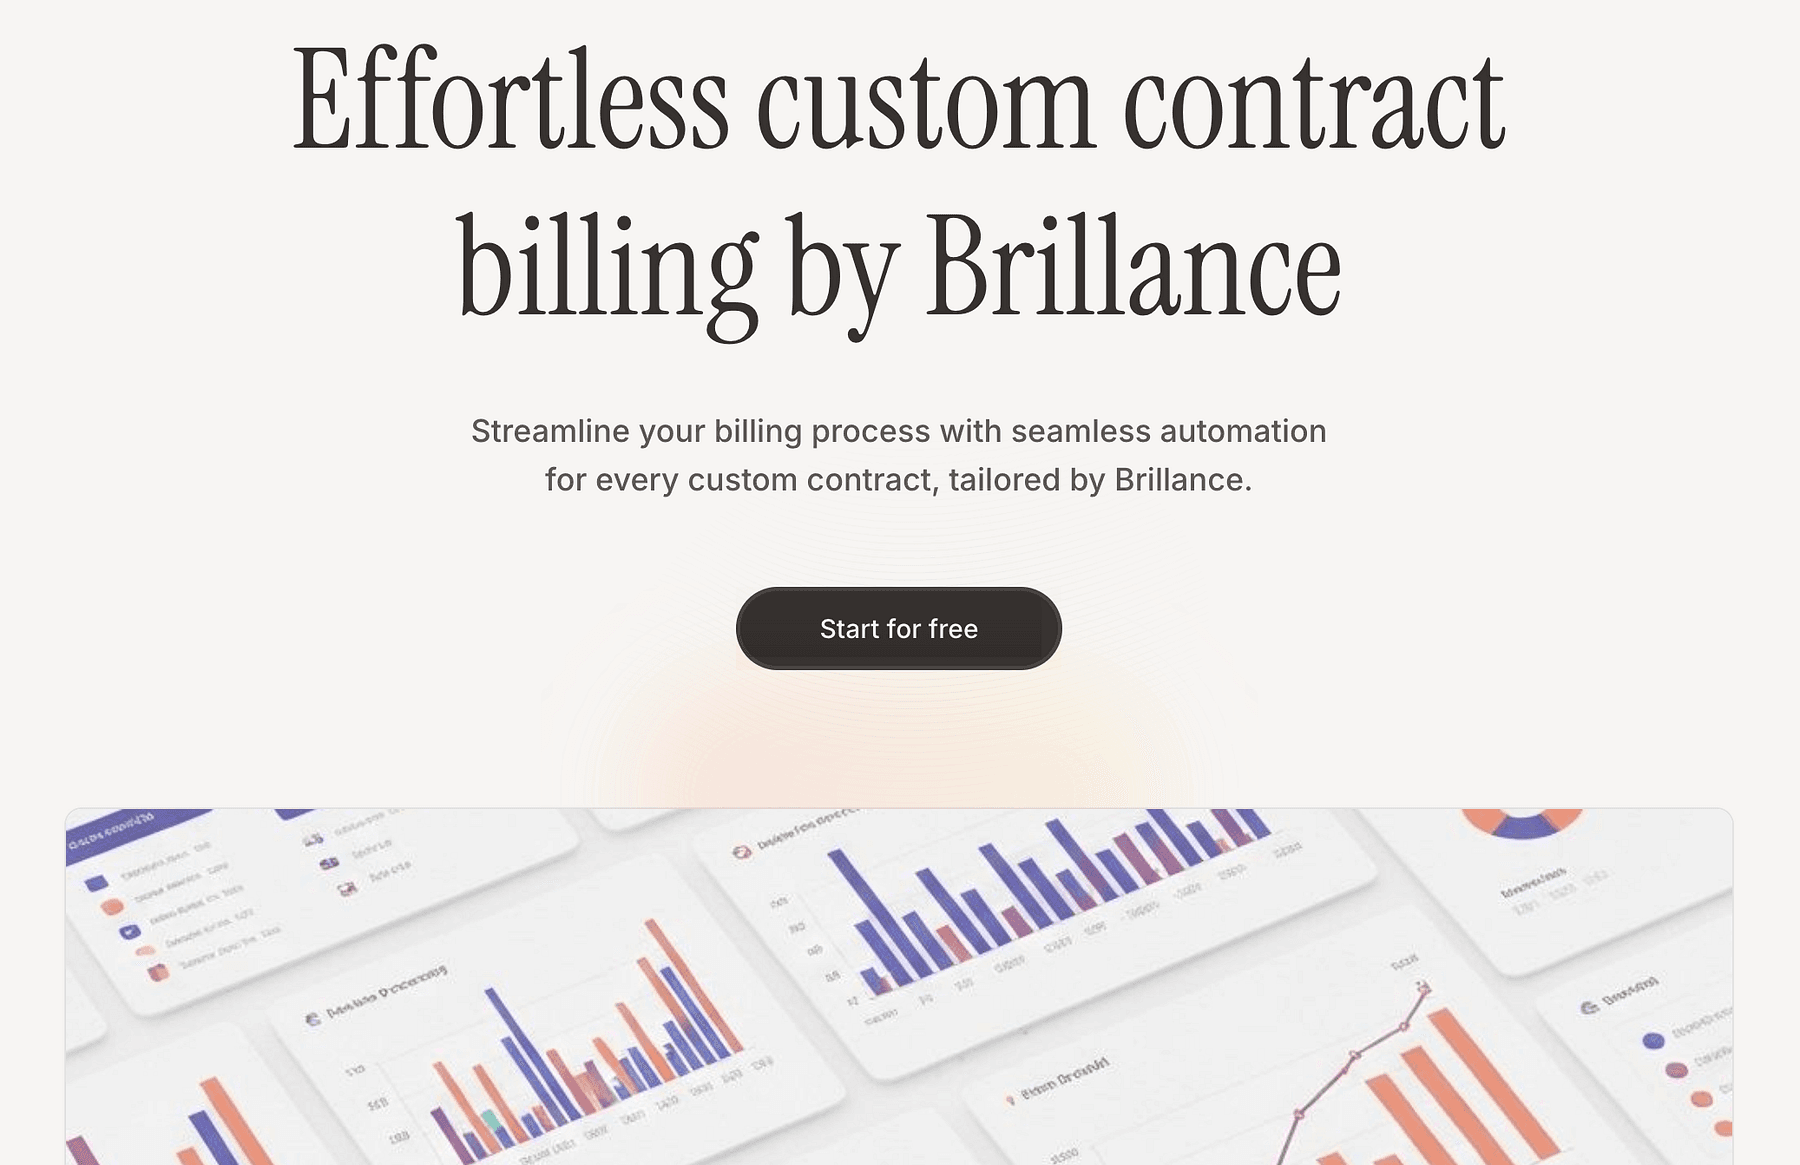
Example: You want a landing page for your SaaS with a hero section, three feature highlights, and a signup form. You tell v0:
“Create a landing page with a header, a tagline that says ‘Track Your Habits Effortlessly’, three columns below with icons and descriptions of features (analytics, reminders, community), and a sign-up form at the bottom.”
Within seconds, v0 generates a React component (or Next.js page) with Tailwind CSS styling matching your description. Perhaps it even uses a nice UI library for the form. You can see an interactive preview.
If something’s off, maybe you wanted a different color scheme, you tweak the prompt: “Use a dark theme with neon accents,” or adjust manually.
Once it looks right, you grab the code. Now you have a polished UI without manually writing a single line of CSS! (Imagine an accompanying screenshot of v0’s interface showing the prompt and generated UI code preview.)
This accelerates development and maintains high aesthetic standards. It’s like having a frontend designer who instantly turns your words into nicely coded components. Keep in mind, v0’s output is meant to be a starting point, you can and should edit the code after copying it into your project. But it has given you a huge head start.
Tip: v0 uses common frameworks, so the code is familiar (e.g., React components). Also, since it’s a Vercel product, it integrates well with deploying on Vercel later. Generating UI with AI frees you to focus on your app’s functionality rather than pixel-pushing CSS.
Step 3: Rapid App Building with Lovable and Replit
With the UI design underway, you need to build the app’s functionality.
Two complementary approaches in our stack are:
- Lovable, a no-code AI app builder for web apps.
- Replit, an online coding platform (with AI assistance) for low-code or custom code.
Lovable lets you build apps and websites from scratch using just prompts, no code.
You chat with Lovable’s AI, telling it what you want your app to do, and it generates the frontend, some logic, and even can integrate basic backend like databases or APIs.
For example, if you prompt, “Create a task management app with a to-do list, ability to add tasks with due dates, and mark them complete”, Lovable will assemble a working web app with those features, forms, lists, maybe even a navigation menu.
Lovable is very useful for quick visualization apps, UI components, and small productivity tools. It produces a TypeScript React frontend which is more visually appealing and customizable than many low-code tools.

Lovable also allows adding integrations: you can ask it to attach a database (it has built-in support to easily connect to Supabase for storing data, which the reviewer praised) or integrate an API like OpenAI by providing your API key.
However, be aware that Lovable may produce only a basic version: complex logic might not work perfectly until a developer refines it.
This is where Replit comes in.
Once Lovable has given you a starter codebase (or if you prefer starting from scratch with code), Replit is an ideal environment to develop your app further. Replit is a cloud-based IDE (integrated dev environment) that lets you code, run, and deploy applications all from your browser.
It’s collaborative (invite team members in real-time), requires no setup (no installing runtimes or libraries on your machine), and supports one-click deployments.
Essentially, “Replit gets you from 0→1 in breakneck speed”, tasks that might take a week can be done in an hour or two.
Good feature of Replit for vibe coding is its built-in AI pair programmer called Ghostwriter. Ghostwriter uses an OpenAI Codex model to autocomplete code, generate functions from comments, explain code, and answer questions, all inside the editor.
As you type, it suggests the next lines (often saving you from syntax errors or boilerplate). You can also highlight a block and ask for an explanation, or write a comment like // function to send welcome email and Ghostwriter will generate the function for you.
It’s like having GitHub Copilot or an AI assistant continuously by your side, but integrated with Replit’s context.
To illustrate, let’s say our app needs a function to calculate a habit streak from a log of completed days.
In Replit, you could just write a comment:
Given a list of dates a user checked in, calculate the longest streak of consecutive days.
Ghostwriter would then suggest a Python (or JavaScript, etc.) function implementing this logic.
You review, maybe tweak a bit, and it’s done in seconds. Ghostwriter can even transform code or find and import open-source snippets (like StackOverflow answers) directly.
This speeds up development and reduces context-switching (you’re not constantly googling how to do X, the AI often can do it or at least help).
Furthermore, Replit provides instant hosting, you can deploy the app by clicking a button or set it to auto-deploy on every commit.
It handles the web server, so you can share a live URL of your prototype right away.
This is fantastic for getting user feedback quickly.
In vibe coding, Replit serves as the place where the magic from other tools (like v0’s UI code or Lovable’s scaffold) comes together.
You bring in the generated pieces, wire them up, and add custom features.
Step 4: Mobile App in Minutes with Rork
What if your product also needs a mobile app (for iOS/Android) to complement the web app?
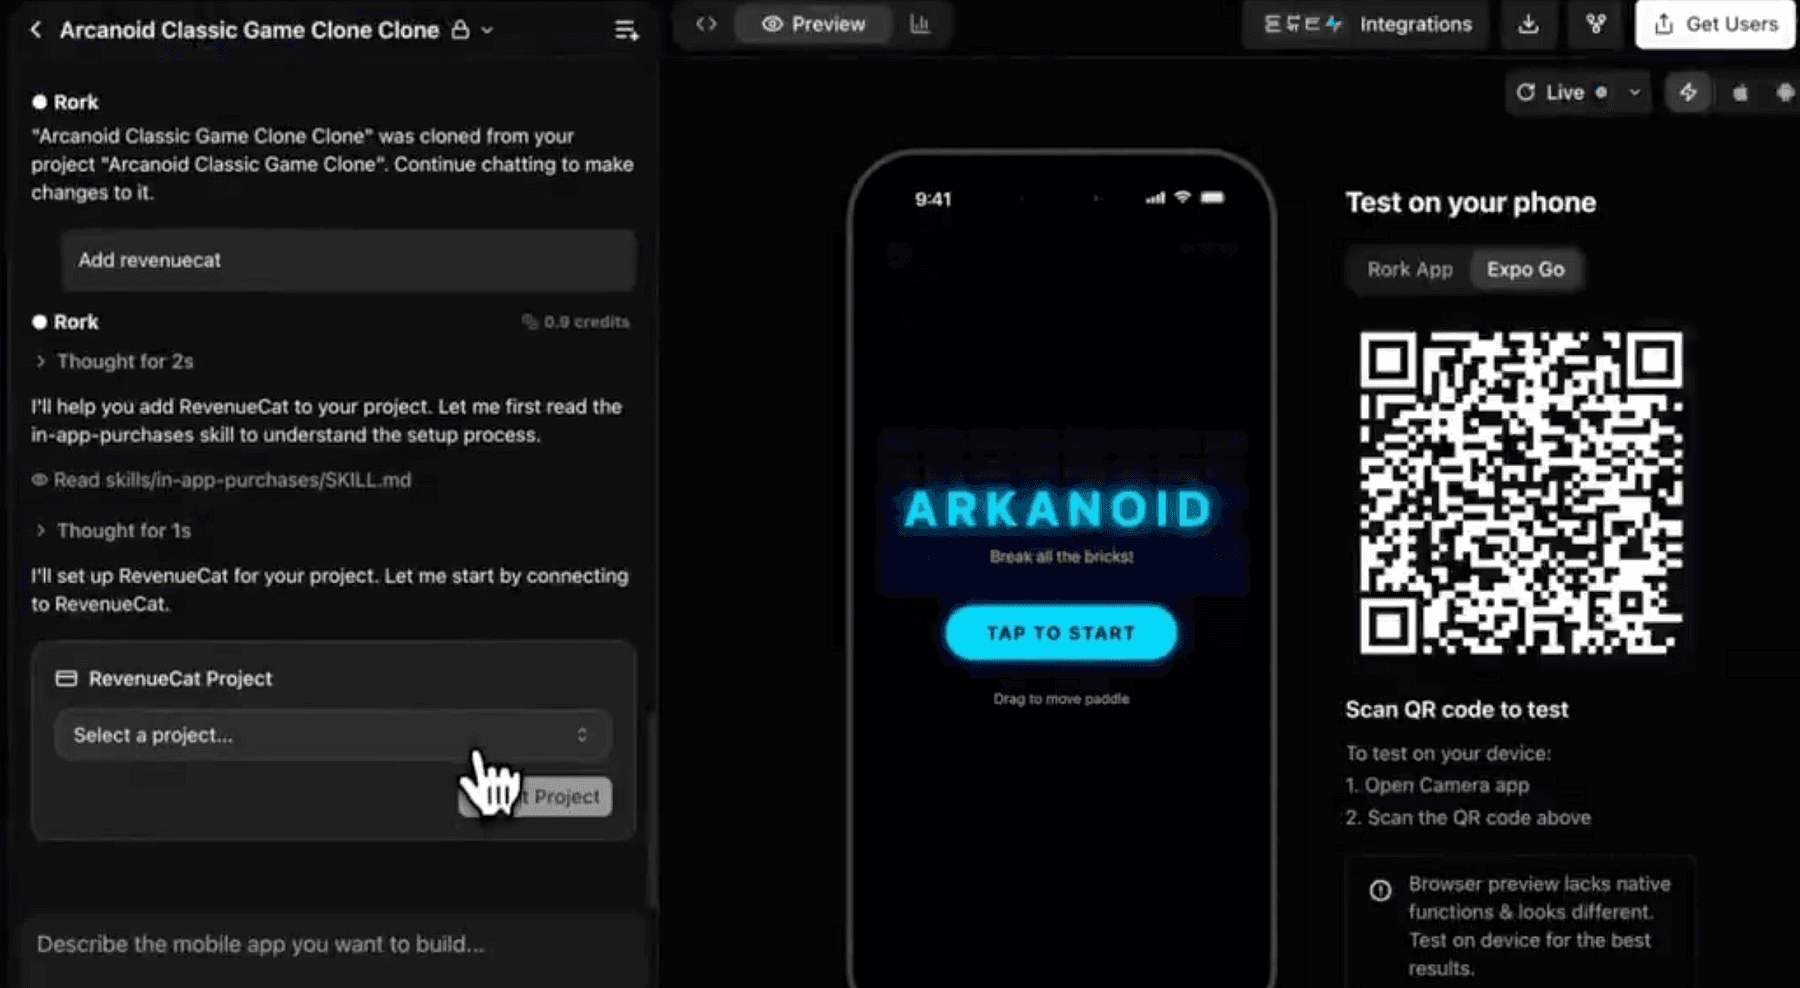
Rork is AI-powered no-code mobile app builder, it lets you describe your app idea and automatically generates a fully functional mobile app from that prompt.
Rork specializes in cross-platform apps using React Native and Expo under the hood.
This means the app it generates can run on iPhones, Android devices, and even as a web app, all from one codebase.
You don’t need to worry about separate iOS/Android code. The workflow with Rork is similar to others:
- Step 1: Describe your app in plain English. For example: “Build a fitness tracker app that allows users to log workouts, set daily goals, and see progress charts. Include user sign-up and a home screen with today’s goal.”
- Step 2: AI Generation: Rork processes that description and in a few minutes produces an initial app structure. It will have screens like Login, Dashboard, etc., navigation set up, and core functionality stubbed out.
- Step 3: You can then customize via conversation, essentially chat with Rork to refine. You might say “Make the dashboard more colorful” or “Add a settings page” and it will adjust the app accordingly.
- Step 4: Rork automatically includes essential features like user authentication, data storage, and basic navigation by default.
- Step 5: Test instantly: Rork provides a live preview (using Expo Go). You can scan a QR code on your phone and see the app running natively, or view it in a web preview.
- Step 6: Publish: When ready, Rork can help package the app for App Store and Play Store using Expo’s tooling.
Under the hood, Rork is running advanced GPT-based models to interpret requests and generate code.
The code is yours to export, it even allows exporting the React Native project to GitHub, so you have full ownership and can modify it manually if needed.
This is great because you’re not locked in, you can treat Rork as a powerful starting point and then continue development like a normal RN project.
It’s also cross-platform from day one, one prompt gave you iOS and Android, and Rork’s use of Expo means you also bypass a lot of environment setup that mobile dev usually requires.
Keep in mind, just like Lovable, extremely complex or niche features might need manual coding after generation. But 80% of common app features (lists, forms, API calls, auth) are handled by Rork’s templates and AI.
By now, you have both a web app and a mobile app version of your product, largely generated by AI.
You’ve saved weeks of coding UI layouts and wiring up basics.
Next, let’s talk about coding assistance in general, because even with these tools, you’ll be writing some custom code or logic. That’s where our AI IDE tools come in.
Step 5: AI Pair Programming with Codex and Claude
Even when using no-code tools, at some point you’ll dip into code, whether it’s to implement a custom feature, debug something, or write a script.
We’ve touched on Ghostwriter in Replit (which is powered by OpenAI Codex), but let’s elaborate on the AI coding assistants and how they integrate, specifically OpenAI Codex and Anthropic Claude.
OpenAI Codex is an AI model that translates natural language into code. It was trained on billions of lines of source code and can autocomplete code or generate code from comments.
OpenAI also recently introduced Codex app for macOS.
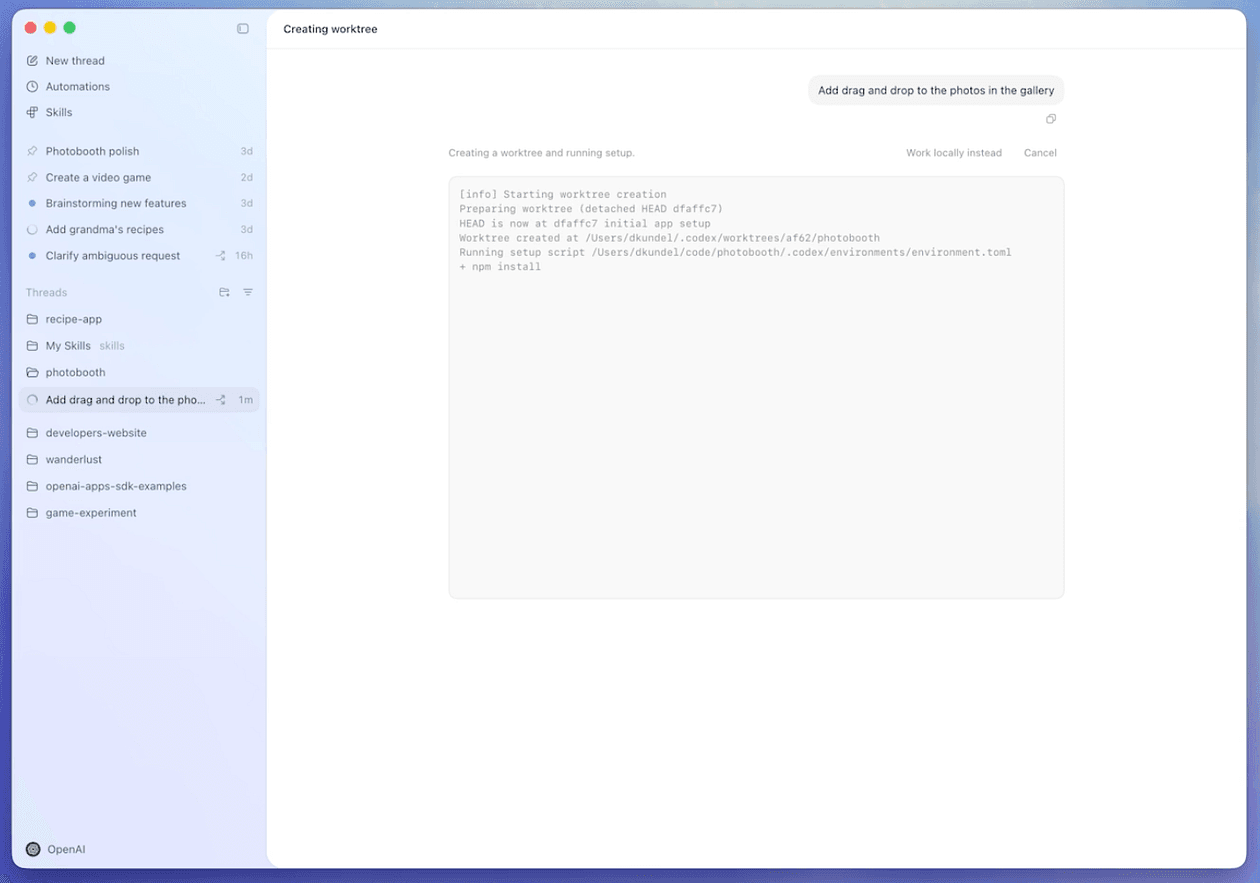
Codex app for macOS is a powerful new interface designed to effortlessly manage multiple agents at once, run work in parallel, and collaborate with agents over long-running tasks.
More important thing here is that Codex will keep you in the flow. You will keep describing what needs to happen, and the code materializes.
You can access Codex’s power via tools like Codex app or VS Code with Copilot or in Replit.
If you prefer working locally, GitHub Copilot (which uses Codex) in VS Code will constantly suggest lines or blocks as you code.
Many devs have reported it can produce ~30–40% of their code, especially boilerplate, instantly.
Claude is another AI assistant by Anthropic, comparable to ChatGPT but with some different strengths.
Claude is known for being helpful, less likely to give harmful output, and very conversational.
One advantage of Claude is its large context window, it can handle very large files or even entire codebases in context, so you can literally paste a long piece of code and ask Claude,
“Why is this function not working? Can you spot the bug?”, and it might pinpoint a logical error or an edge case you missed.
Anthropic also offers Claude Code.
Claude Code, Anthropic’s agentic coding tool that works in your terminal, IDE, desktop app, and browser to help you turn ideas into code faster than ever before.
The combined force of Codex + Claude means you have AI pair programmers with different strengths, however it may take a bit of time to understand how both of them (or one) can fit into your workflow as both offerings are quite frequently updated.
Together, they significantly reduce mental load and let you focus on higher-level logic and product design.
This interplay is also what keeps you in the zone, which is exactly what we want for maximizing development speed and minimizing frustration.
Step 6: Orchestrating Workflows & Automation with n8n
Modern apps don’t exist in isolation, they often connect with other services and have background tasks or multi-step processes.
n8n is a powerful tool in our stack for building these agentic workflows (automated processes and integrations) without having to write glue code for everything.
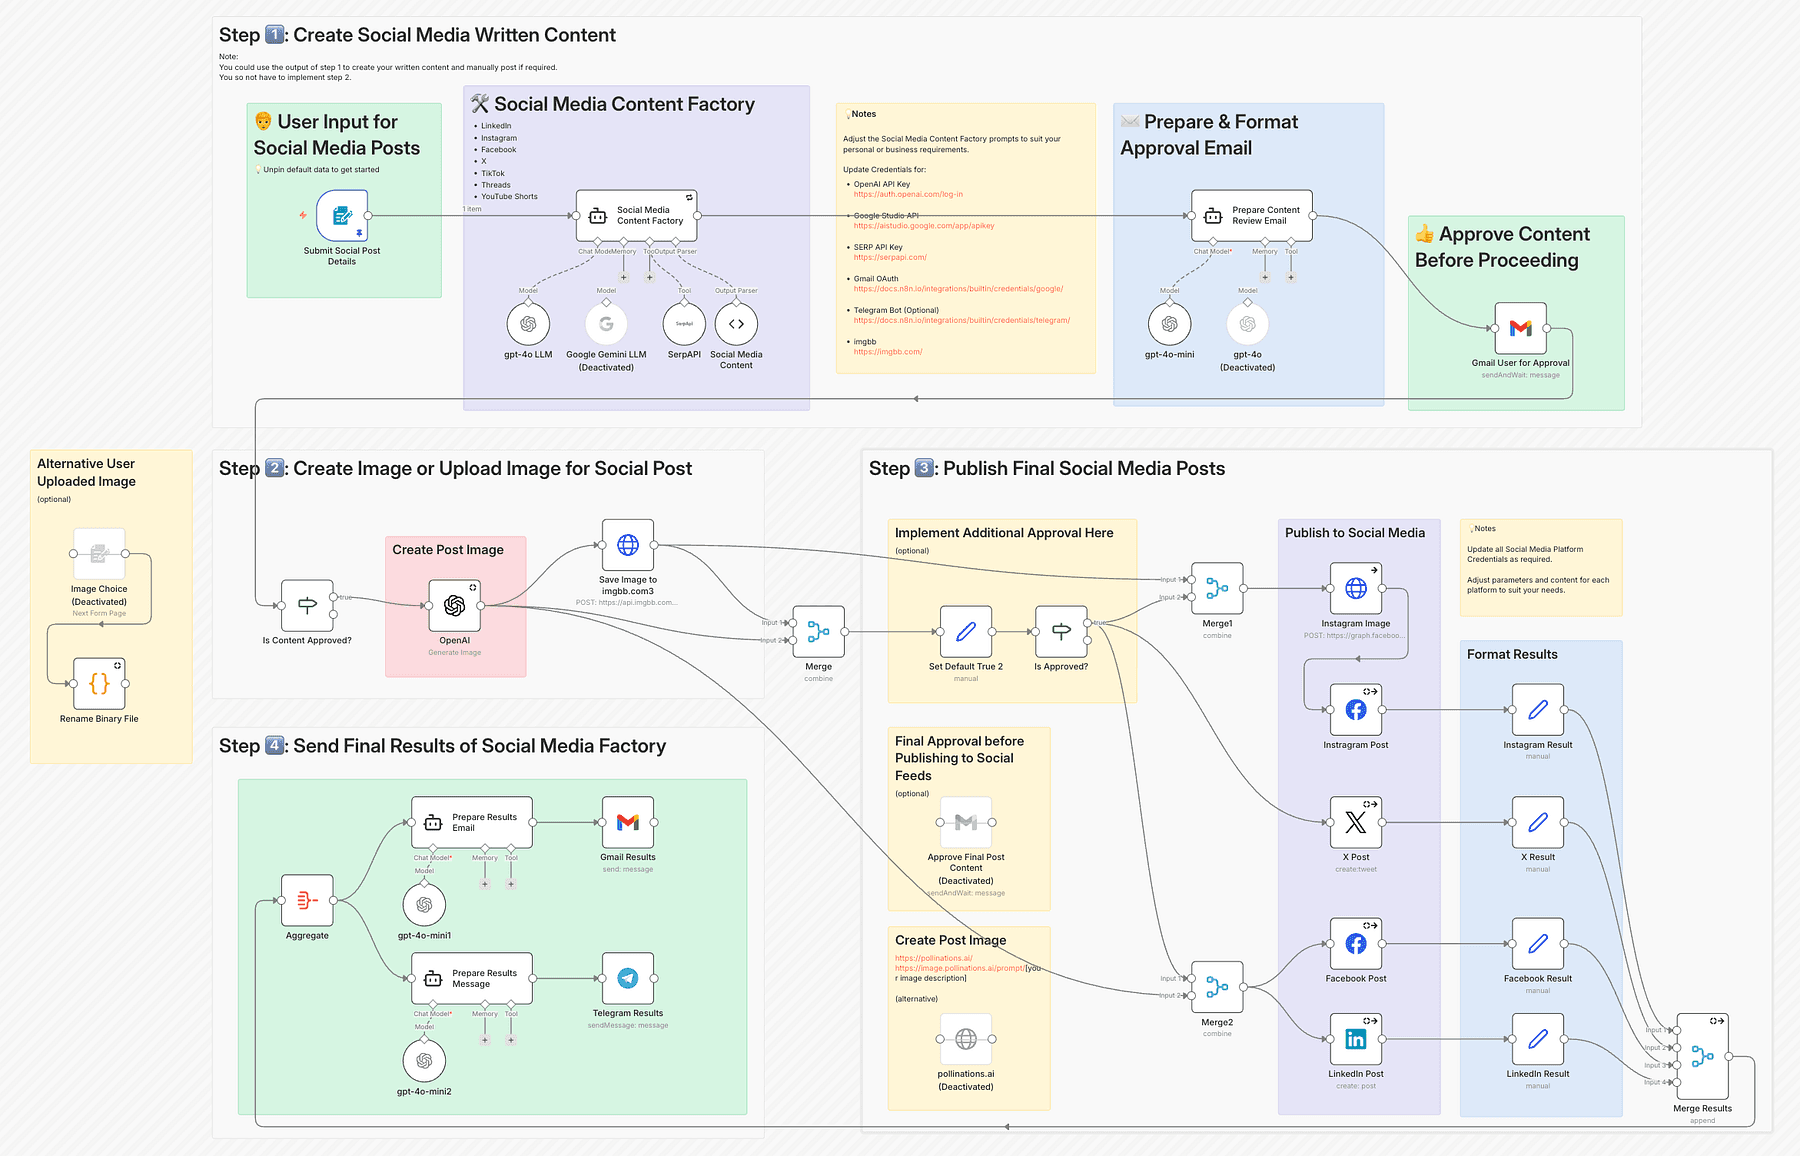
n8n is an open-source workflow automation platform that lets you integrate APIs, automate tasks, and even include AI steps via a visual interface.
Think of it as an “if-this-then-that” builder on steroids with code-level flexibility if needed. It has hundreds of integrations (HTTP requests, databases, SaaS APIs, etc.), so you can chain events together.
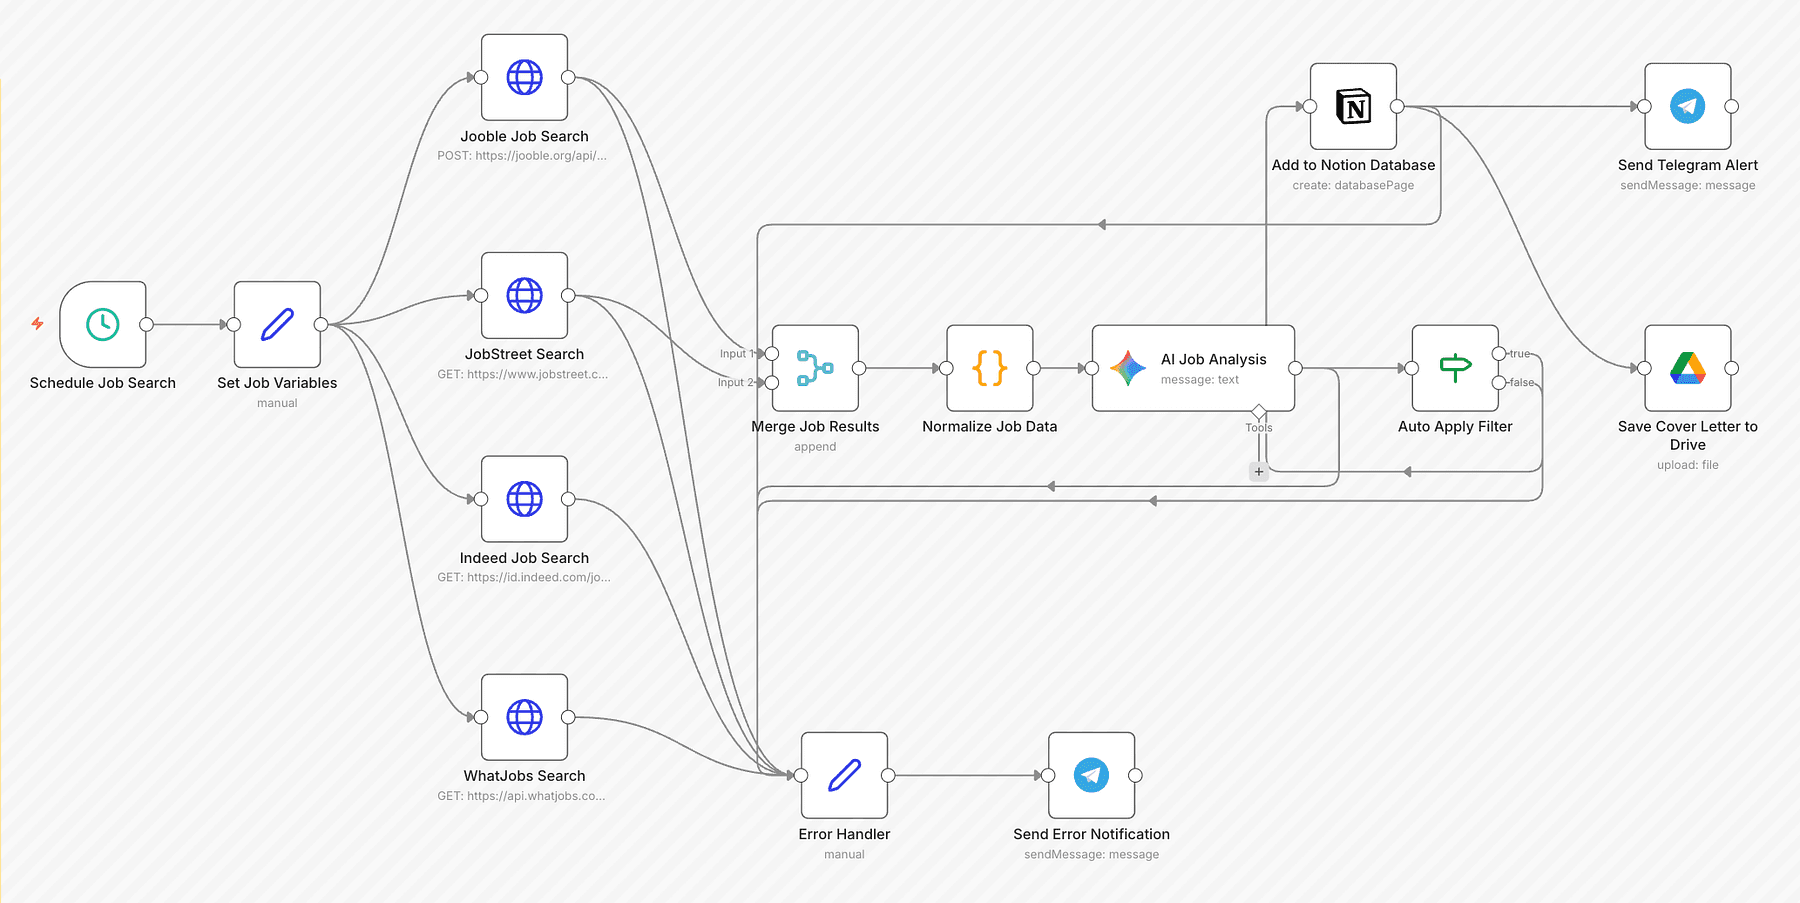
For example, if you want to send a welcome email when a new user signs up, you could either write a server webhook and code it, or just use n8n’s workflow: Trigger = “New row added to Supabase ‘Users’ table” > Action = “Send email via SendGrid API”.
In n8n’s editor, this looks like two nodes connected with an arrow, and you configure each with form inputs (no need to write the actual API call code; you just put your API keys and message template in).
Agentic workflows mean you can incorporate AI decisions in these flows too. n8n now uniquely combines AI into process automation.
For instance, a support ticket comes in (trigger from an inbox), you could have a step where an AI (like GPT via n8n’s OpenAI node) analyzes the sentiment or categorizes it, then based on that, route the ticket to different teams or auto-reply if it’s common.
All without writing a custom microservice for AI, just dragging nodes.
For solo builders, n8n is a secret weapon because it gives you the flexibility of code (“I can do anything”) with the speed of no-code (“just connect these blocks”).
Being source-available, you have control and can even extend it with custom nodes if needed.
Example in our project: Let’s say our habit tracking app wants to send a Slack notification to a user’s accountability partner every time they complete a habit for 7 days straight.
Without n8n, you’d write a cron job or use Supabase Edge Functions to check streaks daily, then call Slack API via some code.
With n8n, you create a workflow:
- Trigger: a cron that runs every day at 9am.
- First node: a Supabase query to get users who have any 7-day streaks ending today.
- For each result: a node that calls Slack API (n8n has a Slack integration) to post a message “Alice just hit a 7-day streak on Habit X! 🎉”.
- Optionally, another node to send an email or update a database table.
And it’s visual, so you can literally see the flowchart of your app’s backend logic.
If something fails (say Slack API is down), n8n can alert you or you can retry automatically.
Another use-case is agentic tasks.
Suppose you want to implement a feature like “weekly summary email” to users with an AI-generated recap of their progress.
With n8n, you could schedule a weekly job that:
- Fetches user’s habit data (Supabase node).
- Passes it to an OpenAI node (GPT-4) with a prompt like: “Summarize this user’s habit progress this week and encourage them for next week”.
- Takes the AI’s summary and sends it as an email (Email node).
All done in a visual workflow.
You just write the prompt text and maybe a template for email body including the summary.
Step 7: Building Intelligent Agents & Advanced AI Workflows with LangGraph
While n8n handles general workflows and simple AI calls, when it comes to embedding complex AI agents into your application (think multi-step reasoning, chatbots that use tools, etc.), LangGraph is extremely powerful.
LangChain is a framework that helps you connect language models to sources of data and tools in a sequence (chain). You can prompt an LLM, get output, feed it into another prompt or into a tool, etc., easily in code.
It’s great for straightforward pipelines (e.g., ask LLM to summarize, then translate that summary).
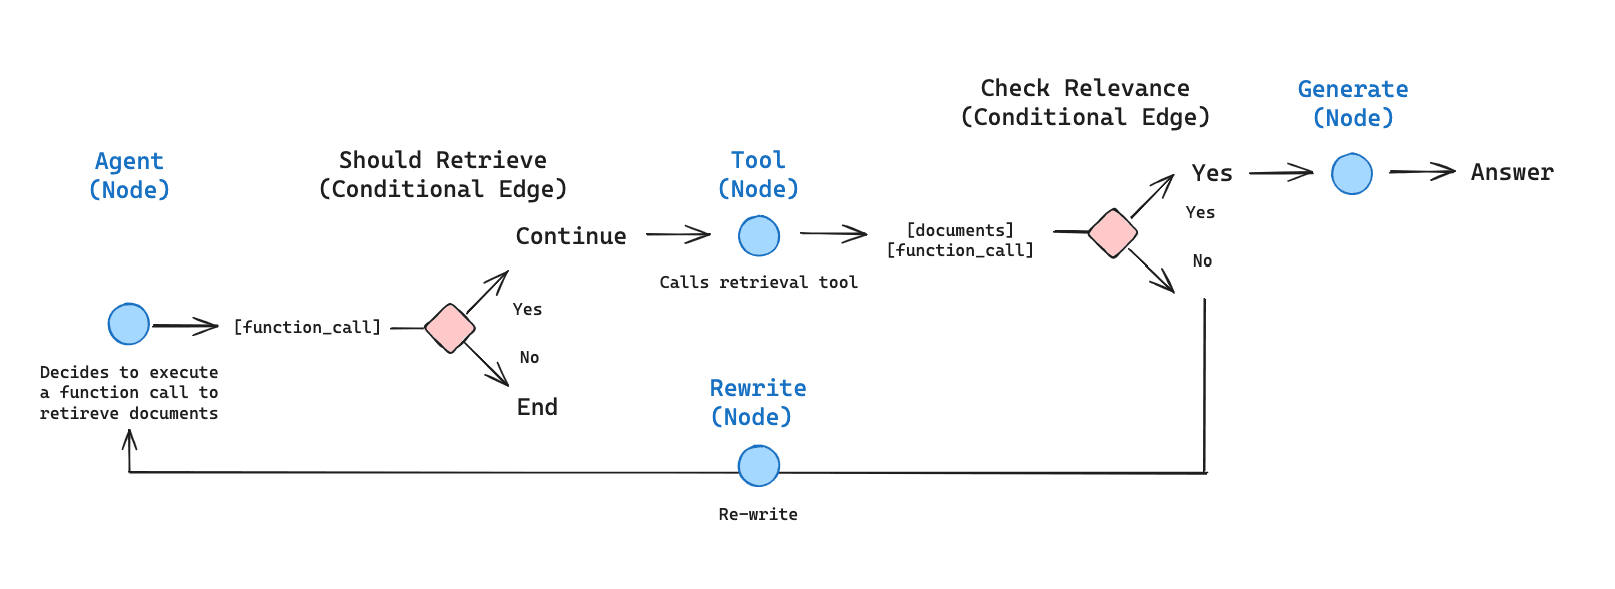
LangGraph has a graph-based approach to AI workflows. Instead of a linear chain, you define nodes (steps or actions) and edges (transitions/conditions) like a flowchart. Each node could be an LLM action, a tool call, a conditional check, etc.
This allows for branching (if the AI’s answer is unsatisfactory, go to a different node), looping (retry or clarify), and parallel processing if needed.
In the context of vibe coding, if your application requires an AI assistant or complex AI feature, you’d use a framework like LangGraph in your backend.
Our stack might use this when implementing things like: a chatbot inside the app that has long-term memory, an AI that monitors user behavior and proactively offers tips, or any scenario where the AI needs to interact with multiple data sources or plan actions (like an “AI agent” performing tasks for the user).
Example: Suppose your habit tracker app has a feature: “Ask the Coach”, where the user can ask an AI coach for advice.
You want this coach to:
- Use the user’s habit data (from the database).
- Possibly use external knowledge (like searching the web for health tips).
- Keep context of the conversation (so it doesn’t forget what was asked before).
- Not hallucinate dangerously (so maybe we want some moderation or constraints).
Using LangChain, you can set up an agent workflow:
- Node: Retrieve user’s habit stats (e.g., via a database query or using LlamaIndex which we’ll discuss soon).
- Node: AI (LLM) receives user’s question + stats. It might produce an answer.
- Decision: Check answer quality, maybe another AI call to see if advice is safe or not too generic. (LangGraph can include a moderation loop).
- If answer is not good: Branch to a node that uses a “Web search tool”, agent queries the web (LangChain has tools for web search).
- Then AI compiles an answer with both internal stats and external info.
- Memory: LangGraph ensures the conversation history is stored in its built-in memory, so next question the user asks, the AI can reference earlier discussion.
LangGraph basically gives you the control flow for reliable AI agents: you can add human-in-the-loop steps, error handling, and stateful memory easily. It’s designed to make these agents production-ready rather than unpredictable experiments.
If you are not building a heavy AI feature, you might not need to touch LangGraph. But it’s great to know it’s in the stack, because as a solo builder you might have an idea to incorporate a smart assistant or automation within your app.
To summarize, n8n and LangGraph both manage workflows, but n8n is more about connecting services and basic AI calls in a low-code way, whereas LangGraph is about the internal intelligence of your app (it’s code-oriented, for building the brains of an AI agent with loops/branches).
They complement each other, i.e. n8n might call a LangChain-powered function as part of a larger automation.
Now, speaking of AI that uses data… The next piece of our stack ensures our AI can actually leverage our app’s data or other content: AutoRAG with LlamaIndex.
Step 8: AutoRAG with LlamaIndex for Data-Powered AI
Many applications today want to use AI not just in a generic way, but grounded in specific data.
For instance, your app might allow users to ask questions about their own data (e.g., “How many days did I achieve my goal in June?”) or you might want to incorporate external knowledge (like answering questions from documentation or articles).
This is where RAG (Retrieval-Augmented Generation) comes in, and our stack uses LlamaIndex to handle that.
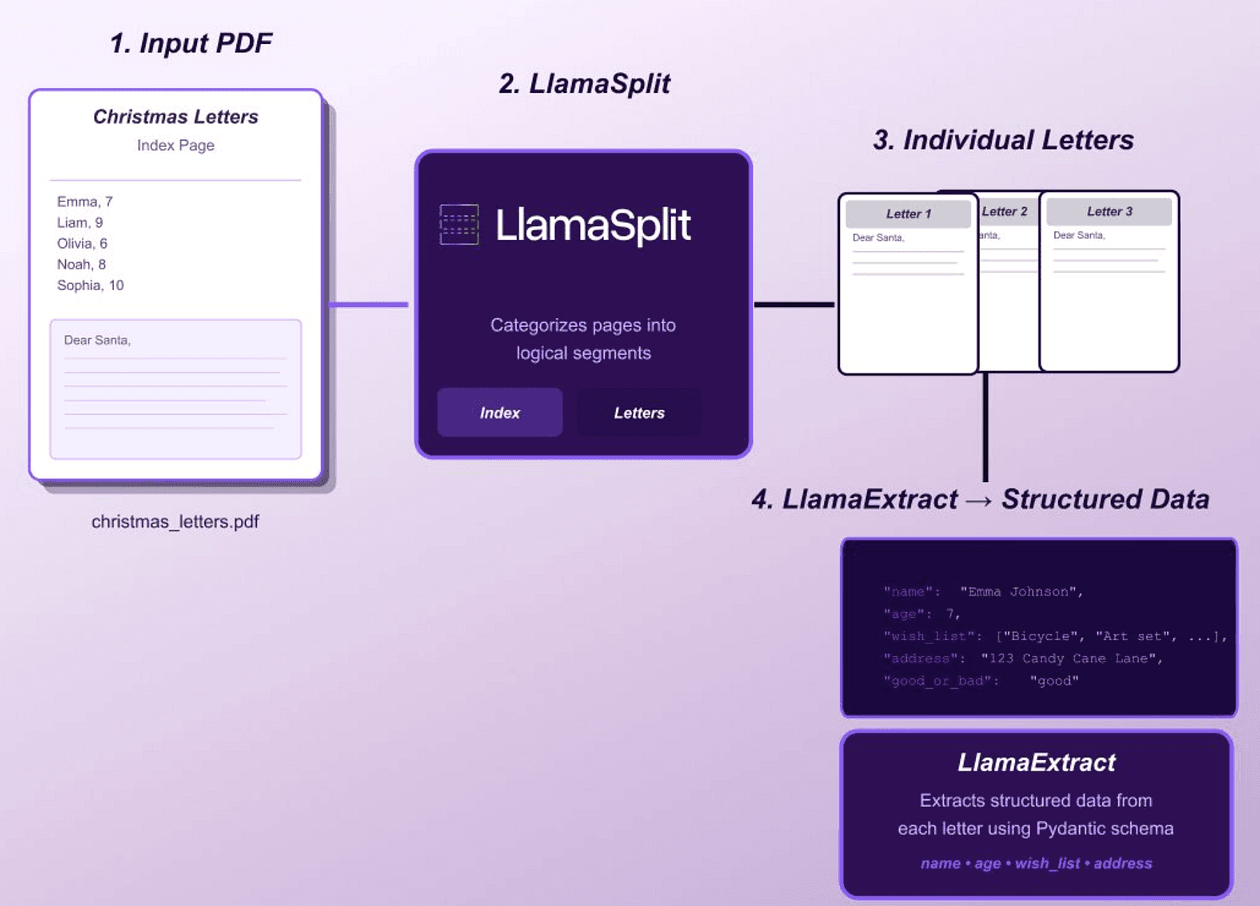
LlamaIndex is an open-source framework that connects LLMs to your external data in an easy way.
It allows you to ingest data (from files, databases, APIs), index it (usually by creating embeddings or other structures), and then query it in tandem with an LLM.
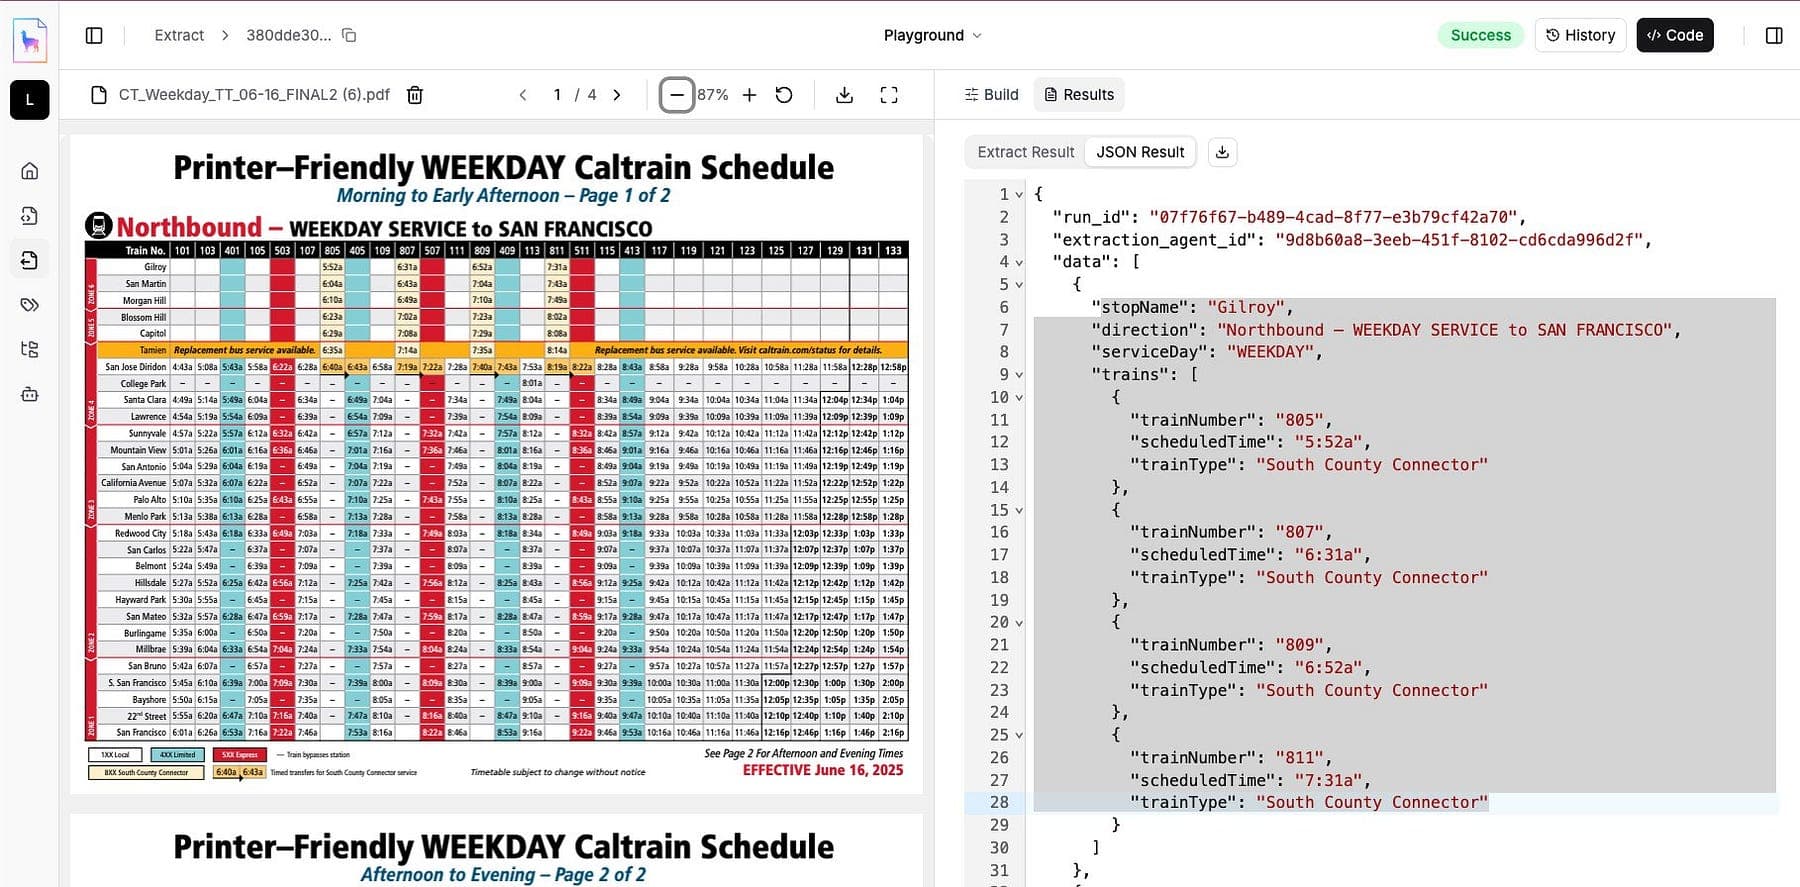
Essentially, it implements RAG: retrieve relevant pieces of data, and feed them into the prompt so the LLM can generate a grounded answer.
AutoRAG means automating that retrieval step, not hardcoding which data to use, but letting the system find it.
LlamaIndex excels at this by providing query engines that given a user question will select the most relevant chunks of your data (via vector similarity or keyword search) and supply them to the LLM. The LLM then has “augmented knowledge”, it’s not limited to its training data, it has your up-to-date or user-specific info to work with.
In our tech stack, LlamaIndex is crucial if:
- You want to create a chatbot that can answer questions about your app’s data (user’s own data or community data).
- Your app includes a lot of content (like articles, documentation, user-generated logs) and you need an AI to summarize or answer from it.
- You have proprietary or dynamic data that the base AI model doesn’t know about (like latest news or a custom dataset).
Suppose we add a feature “Ask Insights” in our habit app: a user can ask, “Which habit did I struggle with the most this month?”
A vanilla ChatGPT won’t know that, because it doesn’t have the user’s data.
With LlamaIndex, we can load the user’s habit log into an index.
When the question comes, LlamaIndex retrieves relevant data (maybe all habits and their completion rates for the month) and gives that to the LLM to answer.
The answer will cite the data, e.g., “You completed the Running habit 5 out of 30 days, which is the lowest completion rate. So that might be the one you struggled with.”
This is accurate and personalized.
Implementing that without a framework would involve manually vectorizing data, searching, etc. LlamaIndex gives simple APIs to do it.
Under the hood, it could use OpenAI embeddings or others, but you as the developer just call high-level functions. It’s an “orchestration” layer for data + LLM.
Step 9: Instant Image Generation with Replicate
No modern product feels complete without eye-catching visuals, whether it’s hero illustrations, app mockups, avatars, or social media banners.
But hiring a designer or illustrating from scratch isn’t always feasible, especially for solo builders.
That’s where Replicate steps in, an AI-powered image generation platform that puts state-of-the-art machine learning models at your fingertips.
Replicate is an API platform for running machine learning models in the cloud, especially known for hosting cutting-edge generative models like Stable Diffusion, ControlNet, Real-ESRGAN, StyleGAN, and many more.
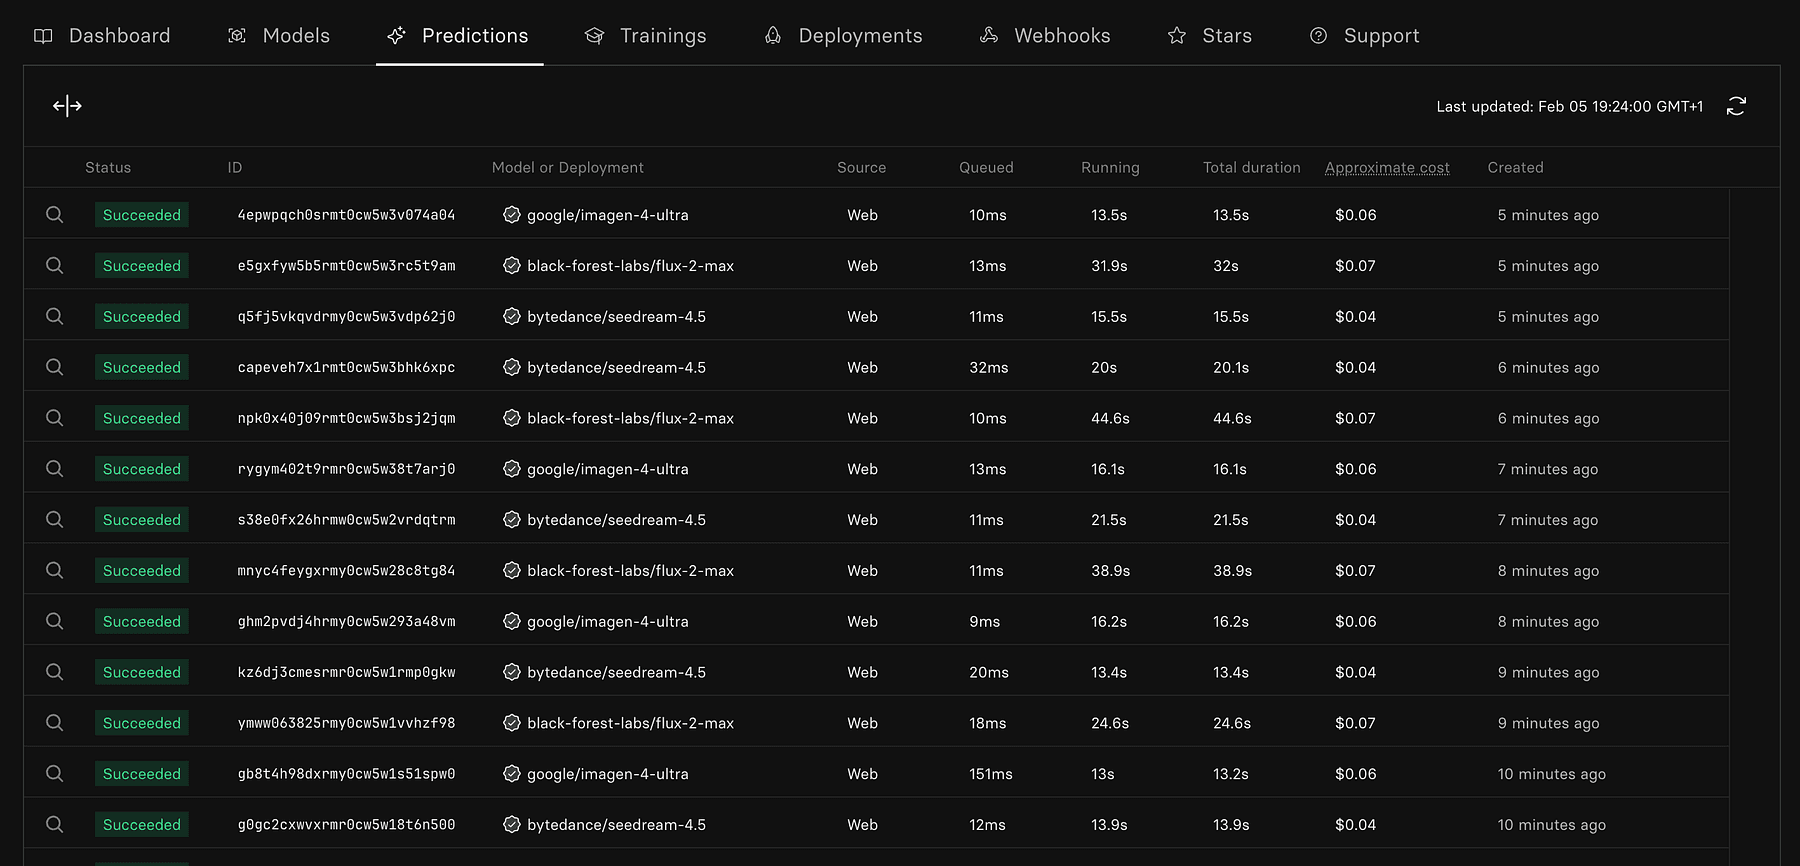
You don’t need a GPU or know how to fine-tune models, Replicate gives you one-liner API access to powerful models maintained by the community.
Compared to tools like Midjourney or DALL·E, Replicate is:
- Developer-first: built to be used programmatically, great for integrations.
- Model-agnostic: hundreds of community models beyond just text-to-image.
- Flexible: run via REST API, in Replit, or hooked into workflows like n8n.
In the spirit of “build fast, launch faster,” Replicate fits perfectly by enabling you to generate:
- Product illustrations for your marketing site
- Feature visuals or UI mockups
- AI-generated avatars for user profiles
- Thumbnails, blog banners, iconography
- Synthetic datasets or placeholders during early development

Instead of spending hours hunting for stock photos or designing from scratch, you can prompt a model like Stable Diffusion and generate on-brand, customizable assets in seconds.
Let’s say your app has a “Weekly Progress Report” feature and you need a visual to go with it.
With Replicate:
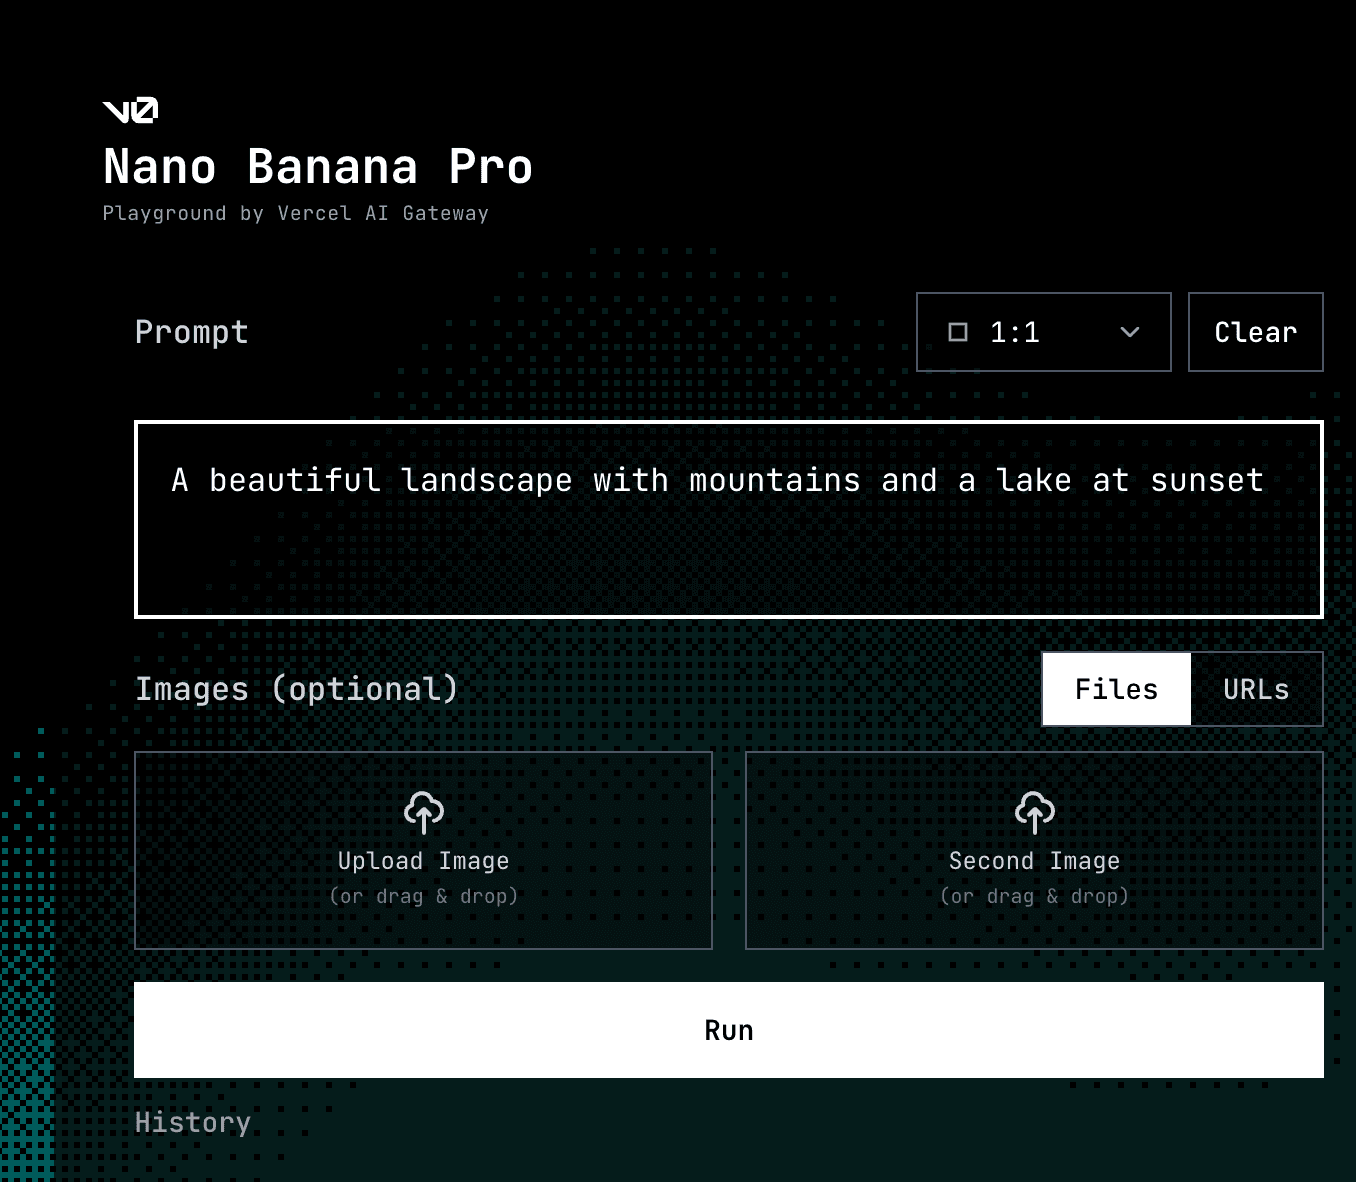
- Go to replicate.com and pick an image generation model (e.g. nano banana, flux)
- Prompt it with: “A modern flat-style illustration of a person checking their fitness progress on a smartphone, background is abstract, soft gradients.”
- Iterate on 3–4 variations.
- Pick your favorite, upscale if needed, and download.
Want to automate it? Use Replicate’s API:
curl -X POST \
-H "Authorization: Token YOUR_REPLICATE_API_TOKEN" \
-H "Content-Type: application/json" \
-d '{
  "version": "stable-diffusion-v1-5",
  "input": {
    "prompt": "a modern dashboard UI illustration, soft pastel colors, 3D style"
  }
}' \
https://api.replicate.com/v1/predictions
This can be run from your backend (Railway), Replit, or even triggered via n8n as part of a content generation workflow (e.g., generate new visuals for each new blog post or feature launch).

You can also use it for:
- User avatars: Use models like StyleGAN to generate diverse, inclusive avatars.
- Mock data: Need 100 images for a “Discover” section? Batch-generate them with varied prompts.
- Loading animations or iconography: Prompt specific icon themes and style them uniformly.
Now, switching gears from AI-centric features, let’s cover the core services every app needs: database, authentication, and payments, which our stack simplifies with some awesome services.
Step 10: Database Foundations with Supabase
Every dynamic application needs a database.
In vibe coding fashion, we don’t want to spend time provisioning databases, setting up ORMs, or dealing with scaling issues.
Supabase is our go-to solution here.
It’s been called “the open-source Firebase alternative” because it offers a suite of backend services, but importantly it’s built on PostgreSQL, giving you a familiar and powerful database under the hood.
What Supabase gives you:
- Postgres database: You get a full Postgres DB for your app’s data.
- Auto-generated RESTful API and GraphQL: Supabase introspects your DB schema and instantly provides an API for it. So if you create a table
habits, you can do REST calls likeGET /rest/v1/habits?user_id=eq.123to fetch rows, no backend code needed. - Authentication (we’ll detail in next step, but yes it has built-in user auth).
- Realtime subscriptions: any changes in the DB can be streamed to the client (great for live dashboards or chat).
- Storage: for file uploads (images etc.).
- Edge Functions: serverless functions (if you need custom backend logic).
- Vector embeddings: recently Supabase even added vector support for AI apps (pgvector).
All this with a generous free tier, and you can self-host because it’s open source.

Using Supabase in our project
Suppose we used Lovable or Rork, they might have already set up Supabase integration when generating (Lovable can attach Supabase for database needs as per that review).
If not, we can manually use Supabase by:
- Creating a project (via their dashboard, takes 30 seconds to spin up a new Postgres).
- Using their JavaScript/Flutter/etc. SDK in our app. For example, from our web or mobile app, we can directly call the Supabase client to read/write data. No need to build a separate backend for basic CRUD, it’s already an API.
For our habit app, we’ll have tables like users, habits, completions.
We define those in Supabase (via a SQL GUI or their Table editor).
Immediately, we have an API to insert new habits or get a user’s completions.
The Supabase client library handles auth tokens, etc., so in code it’s as simple as:
// Fetch habits for current user
let { data: habits } = await supabase.from('habits').select('*').eq('user_id', currentUser.id);That one line replaces what normally would be setting up an Express.js server route, writing SQL, etc.
Supabase’s real-time feature could also be used: we could subscribe to completions table changes so that if the user’s friend completes a habit and we want to show that in real-time, it just pops in via websockets.
Additionally, Supabase’s Edge Functions (which are essentially serverless Node functions) let you write custom code if needed, e.g. maybe a scheduled function to reset streaks monthly or something.
But many times, you can do quite a lot with just SQL and their API (they even support Row Level Security for fine-grained auth rules, which we will use with Clerk in a moment).
The bottom line is, Supabase gives you production-ready backend infrastructure out-of-the-box.
Instead of spending days setting up a database server, API framework, and auth, you spend maybe an hour configuring Supabase and then you’re back to building features.
Supabase is also scalable and you can pay as you grow (or self-host if you prefer). So the “scale to millions” part means you won’t have to migrate off of it when your user count skyrockets, it’s Postgres at heart, which we know can handle large scale with the right tuning.
Step 11: User Authentication with Supabase Auth or Clerk
Almost every app needs user authentication and authorization (sign ups, logins, password resets, maybe social logins, managing user sessions). This can be a huge time sink if done from scratch (and security pitfalls galore).
Our stack can leverage two products to handle auth seamlessly: Supabase Auth or Clerk.
Supabase has built-in auth that ties into the Postgres database with Row Level Security.
It’s quite powerful: you can enable email/password signups, magic link logins, OAuth with Google, Facebook, etc. It uses GoTrue (the same library behind Netlify Identity) under the hood.

The nice part is it integrates with the database permissions, you can write policies like “a user can only select/delete their own records” using the auth.uid() match in SQL.
Supabase Auth covers the basics pretty well for many cases, and the Supabase JS/Flutter client makes handling the auth state straightforward (you get methods like signUp(), signIn() and it manages session tokens).
However, Supabase’s built-in UI for auth is minimal, you might need to create the forms and modals yourself (though they do have some prebuilt React components and examples). If you want a more complete drop-in solution for a polished user management experience, that’s where Clerk shines.
Clerk is a developer-focused authentication and user management platform that provides prebuilt, beautiful UI components for sign-in, sign-up, profile management, etc..
With Clerk, you don’t have to design the auth flows, you can literally embed <SignIn />, <SignUp /> React components (or use their headless API) and get a production-grade UI with all the edge cases handled (verification, multi-factor, social login buttons, etc.).
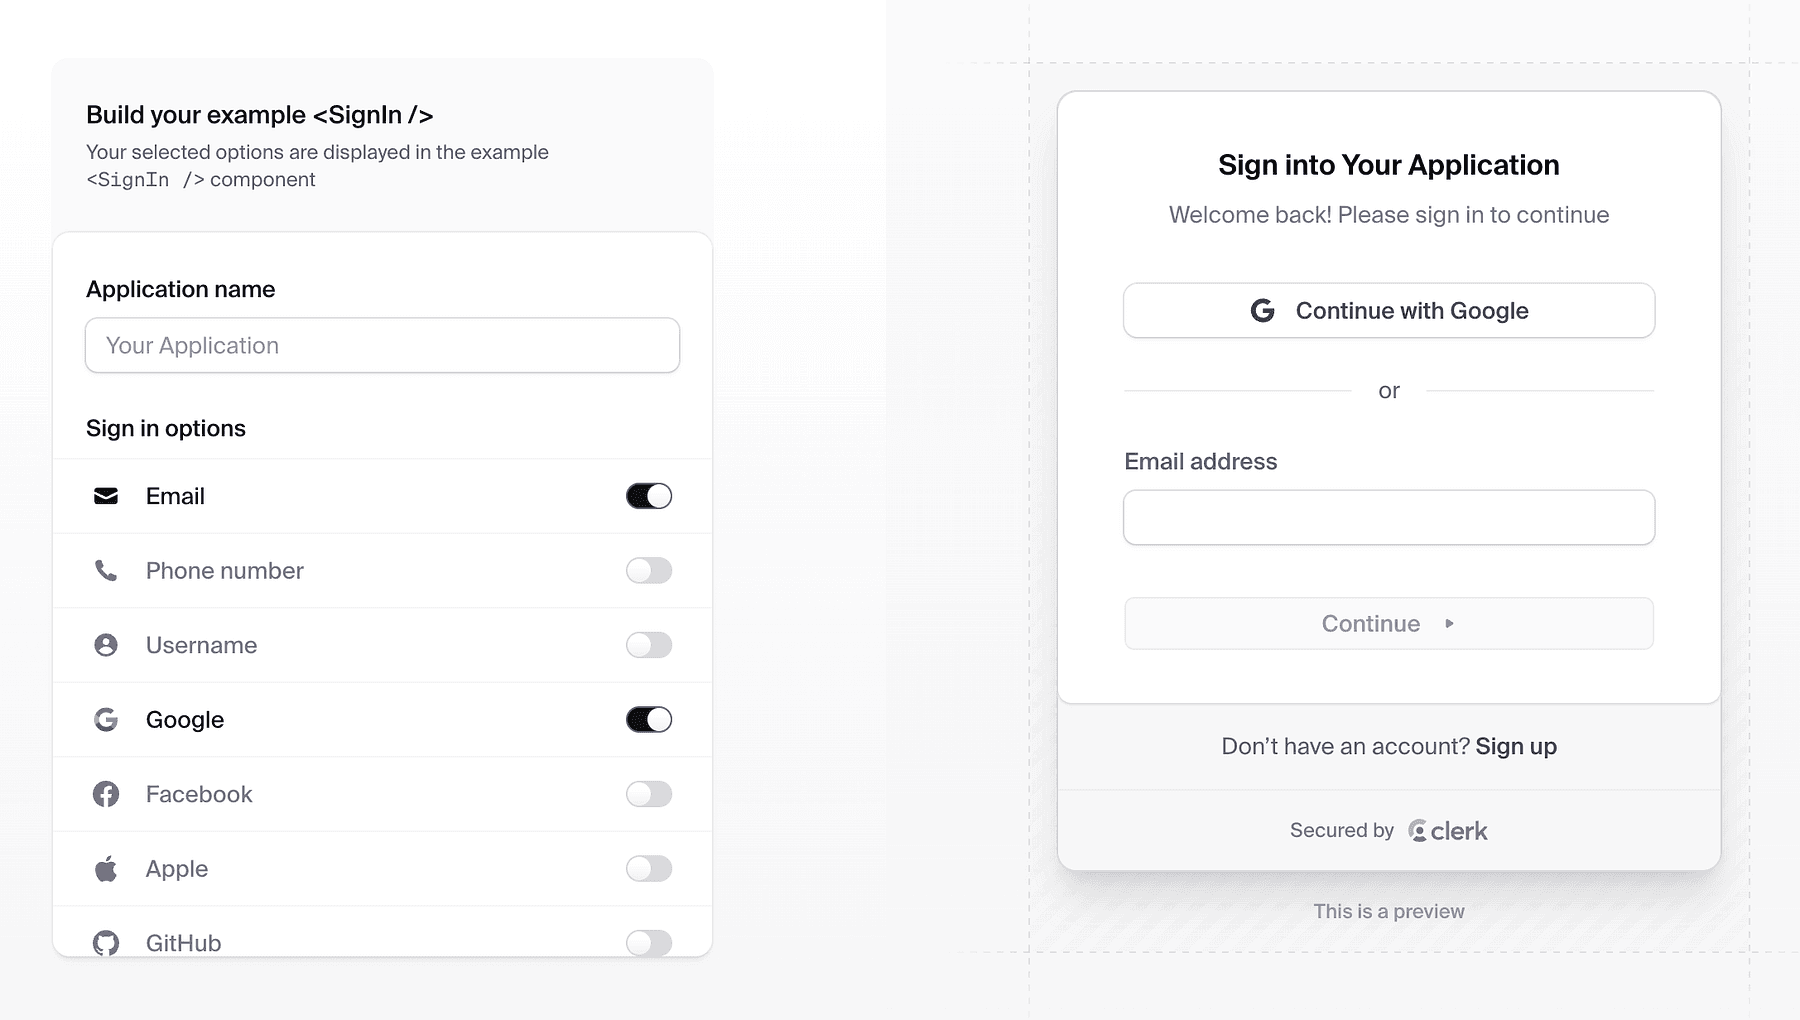
It handles the whole user session lifecycle securely (device management, token refresh, etc.).
If you want simplicity and fewer moving parts, Supabase Auth alone might suffice (just custom build a simple sign-in form). If you want the most polished user system (especially if you need advanced features like multiple sign-in methods, enterprise SSO, etc.), Clerk is a good start.
Step 12: Subscriptions with RevenueCat
So your app is built and users are signing up, how do you charge money for it?
Implementing subscriptions or one-time purchases, especially across web and mobile, can be very complex (App Store, Play Store, Stripe on web, syncing receipts, etc.). RevenueCat solves this elegantly for us.

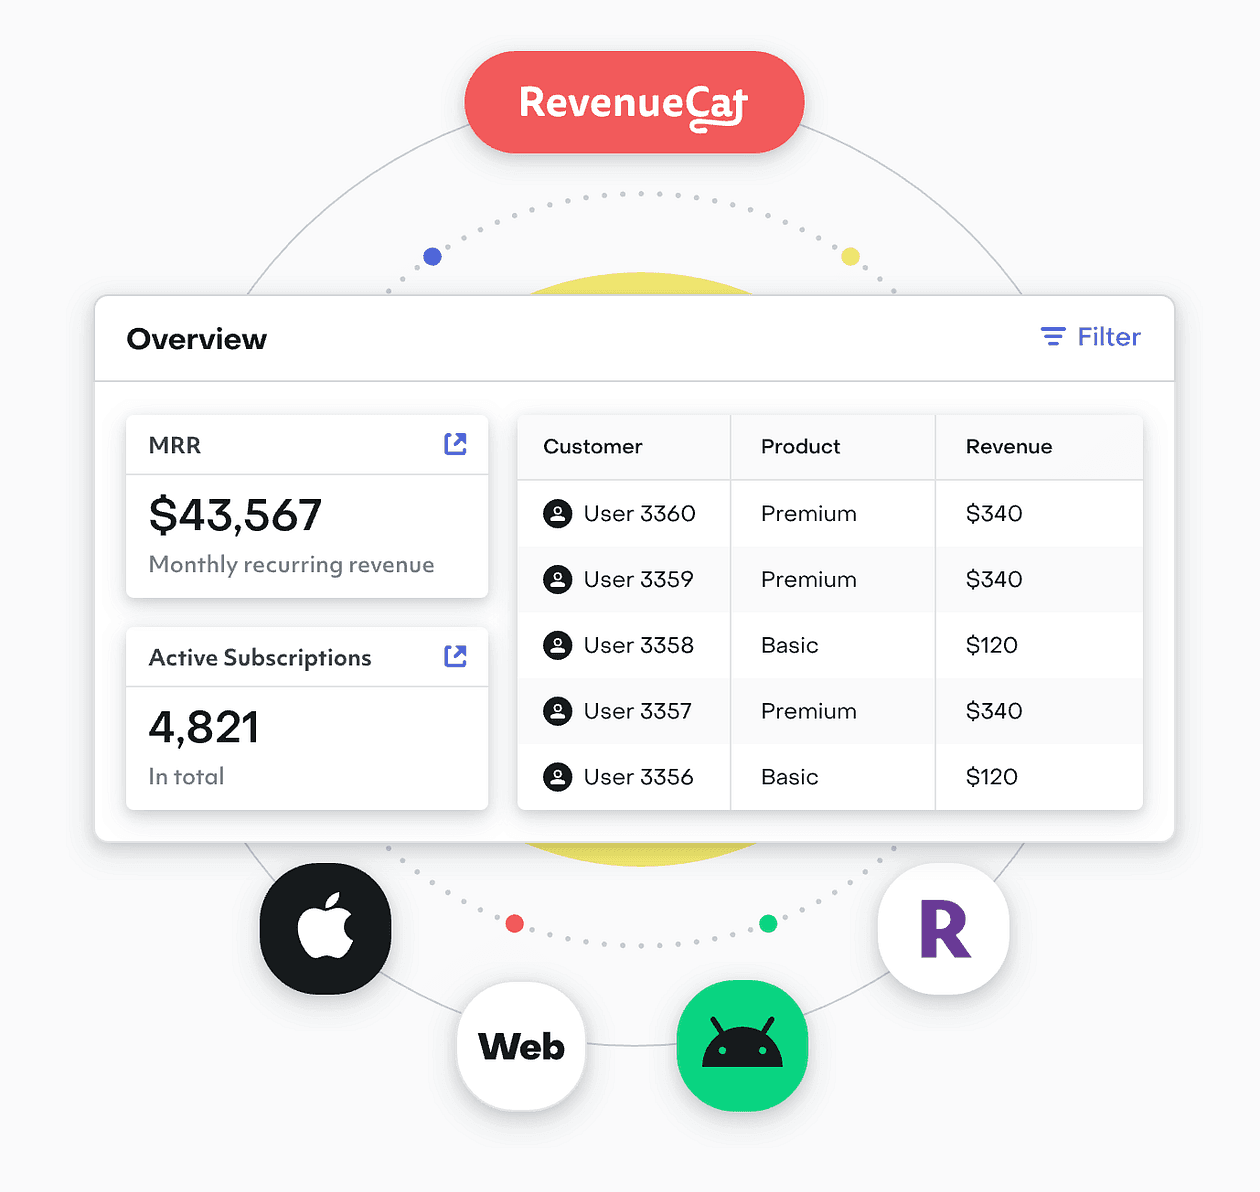
RevenueCat is a platform that manages in-app subscriptions and purchases.
It provides a unified API and dashboard to handle purchase validation, subscription status, cross-platform sync, and more, so you can focus on building product features instead of payment infrastructure.
Key features of RevenueCat for vibe coders:
- Unified subscriptions: You define your products (e.g., “Pro Plan Monthly”, “Pro Plan Yearly”) in RevenueCat, and integrate their SDK in your app. RevenueCat handles talking to Apple App Store, Google Play Billing, and even web (Stripe) if you use their web hooks or new web SDK.
- Cross-platform: If a user buys on iOS, RevenueCat can sync that to your backend so their account is upgraded everywhere (like on web). It abstracts the differences between stores.
- No server needed for receipts: Normally verifying Apple receipts is non-trivial (server-to-server notifications, etc.). RevenueCat does that and just gives you a simple status: “this user is active subscriber until X date”, available via SDK or webhooks to your server.
- Analytics and experiments: RevenueCat also gives you charts, trial conversion rates, etc., and even features like remotely configuring paywalls and A/B testing pricing without app updates.
- Supports one-time purchases and consumables too, not just subs.
For a solo founder, using RevenueCat means you don’t have to become an expert in App Store rules or implement Google’s billing client logic beyond the basics.
You use their client library which is straightforward. They have SDKs for iOS (Swift), Android, React Native, Flutter, etc.
Our habit app might offer a “Premium” tier with features like unlimited habits or an AI coach.
We decide to charge $4.99/month or $49/year.
We go to RevenueCat, create an offering “Premium”, with products linked to App Store Connect and Google Play (RevenueCat’s docs guide through that).
In our app, we add their SDK. On the pricing screen, instead of manually handling purchase flows, we call something like Purchases.shared.purchasePackage(package) (their API) when user clicks “Upgrade”.
RevenueCat handles the native purchase dialog. After purchase, the SDK tells us success and now this user is premium.
Now, how do we enforce premium features in our app?
The simplest way: ask RevenueCat for the user’s entitlements. RevenueCat uses the concept of entitlements, e.g. “premium” entitlement is granted if user has an active subscription.
In our app code, we check Purchases.shared.customerInfo which contains entitlements. If “premium” is active, we unlock the features. If not, we restrict or show paywall.
If we have a backend (like Supabase), we can also receive webhooks from RevenueCat to update our database of who is premium. But for many cases, you might not even need that, just let the client SDK handle it.
RevenueCat is trusted by tons of apps, so it’s battle-tested. They have a generous free tier (up to $10k monthly revenue free, for example), which means zero cost until you really start making money, which is ideal for indie devs.
Step 13: Documentation with Mintlify
After building your application, especially if it’s a developer tool or complex product, you need documentation for users (or for yourself and your team).
And as a builder, you likely have a lot of notes, research, and design docs that could benefit from AI organization.
That’s why our stack includes Mintlify.
Mintlify is an intelligent documentation platform that helps you create beautiful, modern docs sites with AI assistance.
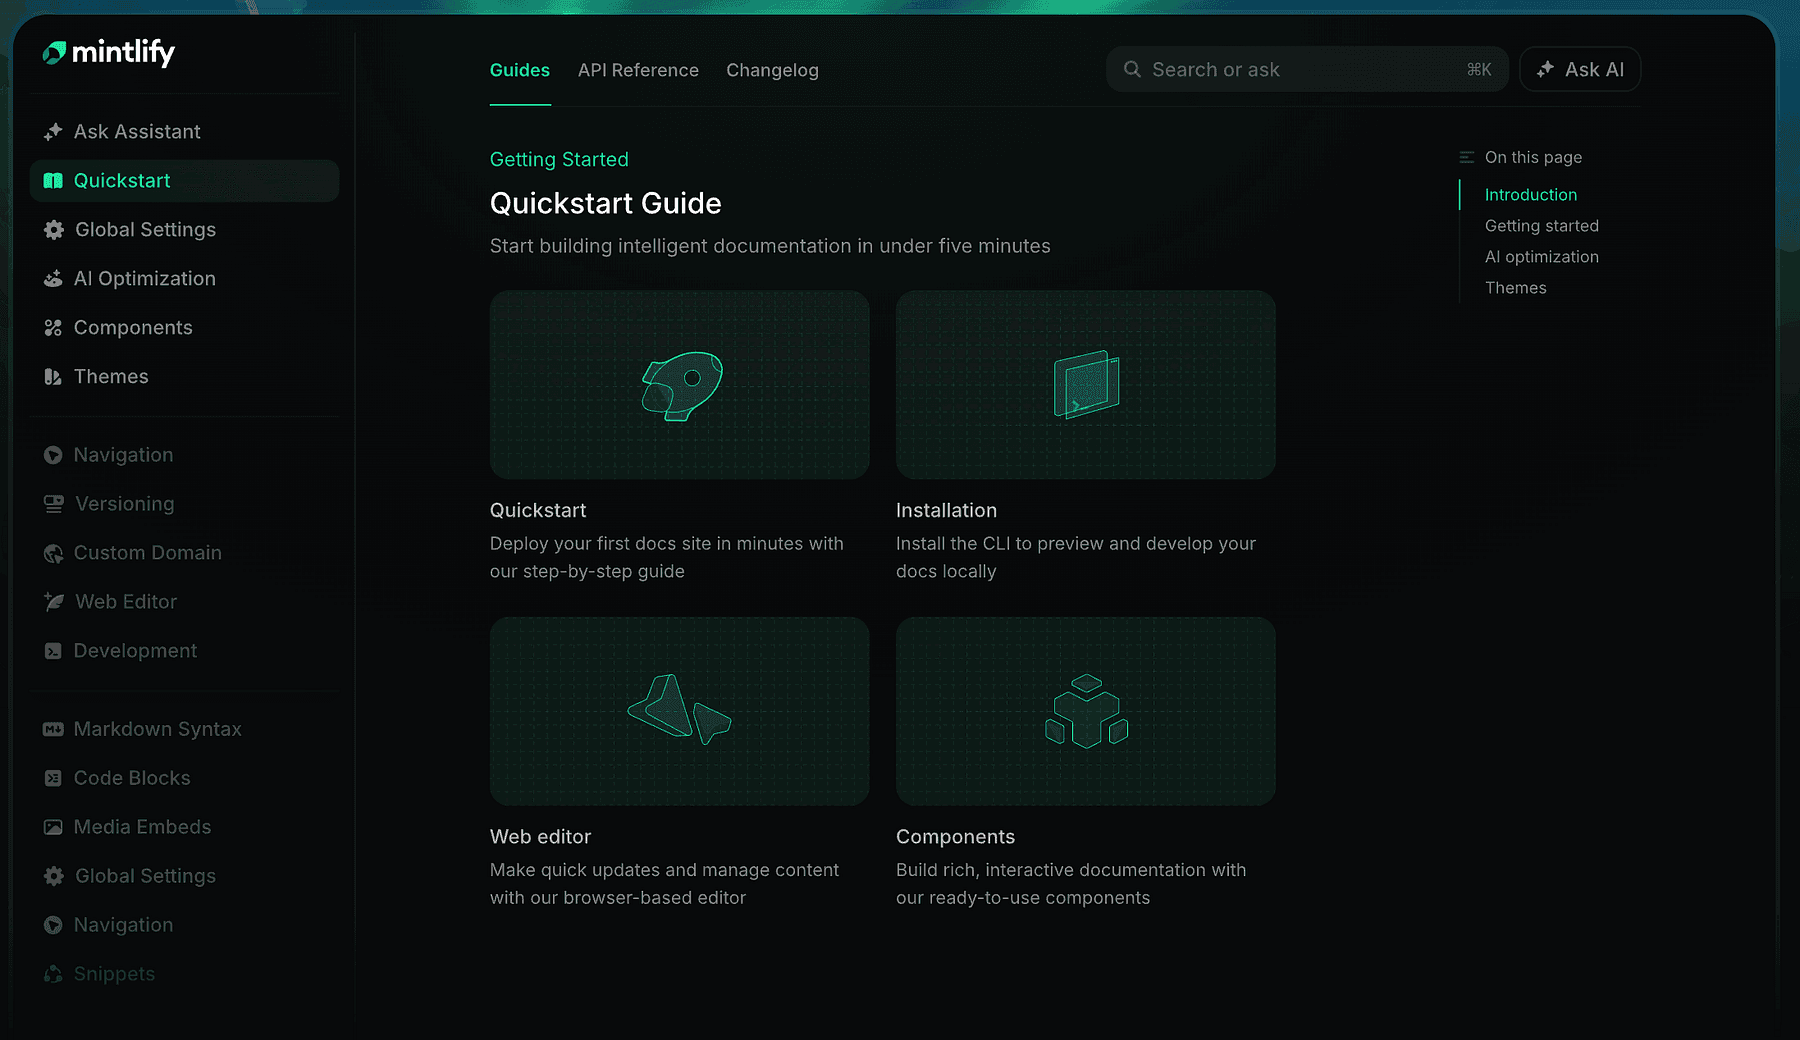
If you’ve seen sleek docs like those of Stripe or Twilio and wished you could easily produce something similar, Mintlify is for you.
It takes your documentation content (which can be in Markdown/MDX in a repo) and turns it into a gorgeous website with search, dark mode, etc., with minimal config.
But Mintlify goes beyond static docs, it’s AI-native.
It can auto-generate parts of docs from your codebase (e.g., it can scan your code or comments to build API references), and it provides an AI assistant on your docs site, meaning users can ask documentation questions in a chat and get answers drawn from your docs content.
From a developer perspective, Mintlify sits in a nice spot between a pure “docs-as-code” approach and more interactive solutions.
You write docs in your repo (or their editor), and Mintlify’s AI helps by:
- Suggesting improvements or finding inconsistencies.
- Potentially keeping docs updated as code changes (spotting when sample code is out-of-sync).
- Answering users’ questions via that AI assistant trained on the docs (so you reduce support load).
If our habit tracker had an API or we wanted to expose some advanced usage tips, we’d document it.
Using Mintlify, we could get a documentation site up in a day. It’s “beautiful out-of-the-box and built for developers”, likely meaning code blocks, copy buttons, and all the niceties devs expect are included.
It’s also great for internal documentation. In a startup or solo project, you might not think of docs early, but having at least a README or guide is useful as you grow.
Mintlify can make even a small project look professional with minimal effort.
Step 14: Deployment with Vercel and Railway
Now that the app is built, tested, and documented, the final step is getting it into users’ hands.
Deployment and hosting can be a headache traditionally, but our stack uses Vercel and Railway to make this nearly effortless.
Vercel is perfect for deploying front-end applications (and some backends via serverless).
Vercel is the company behind Next.js, and it provides a platform where you can push your code and have it live on a global CDN within minutes.
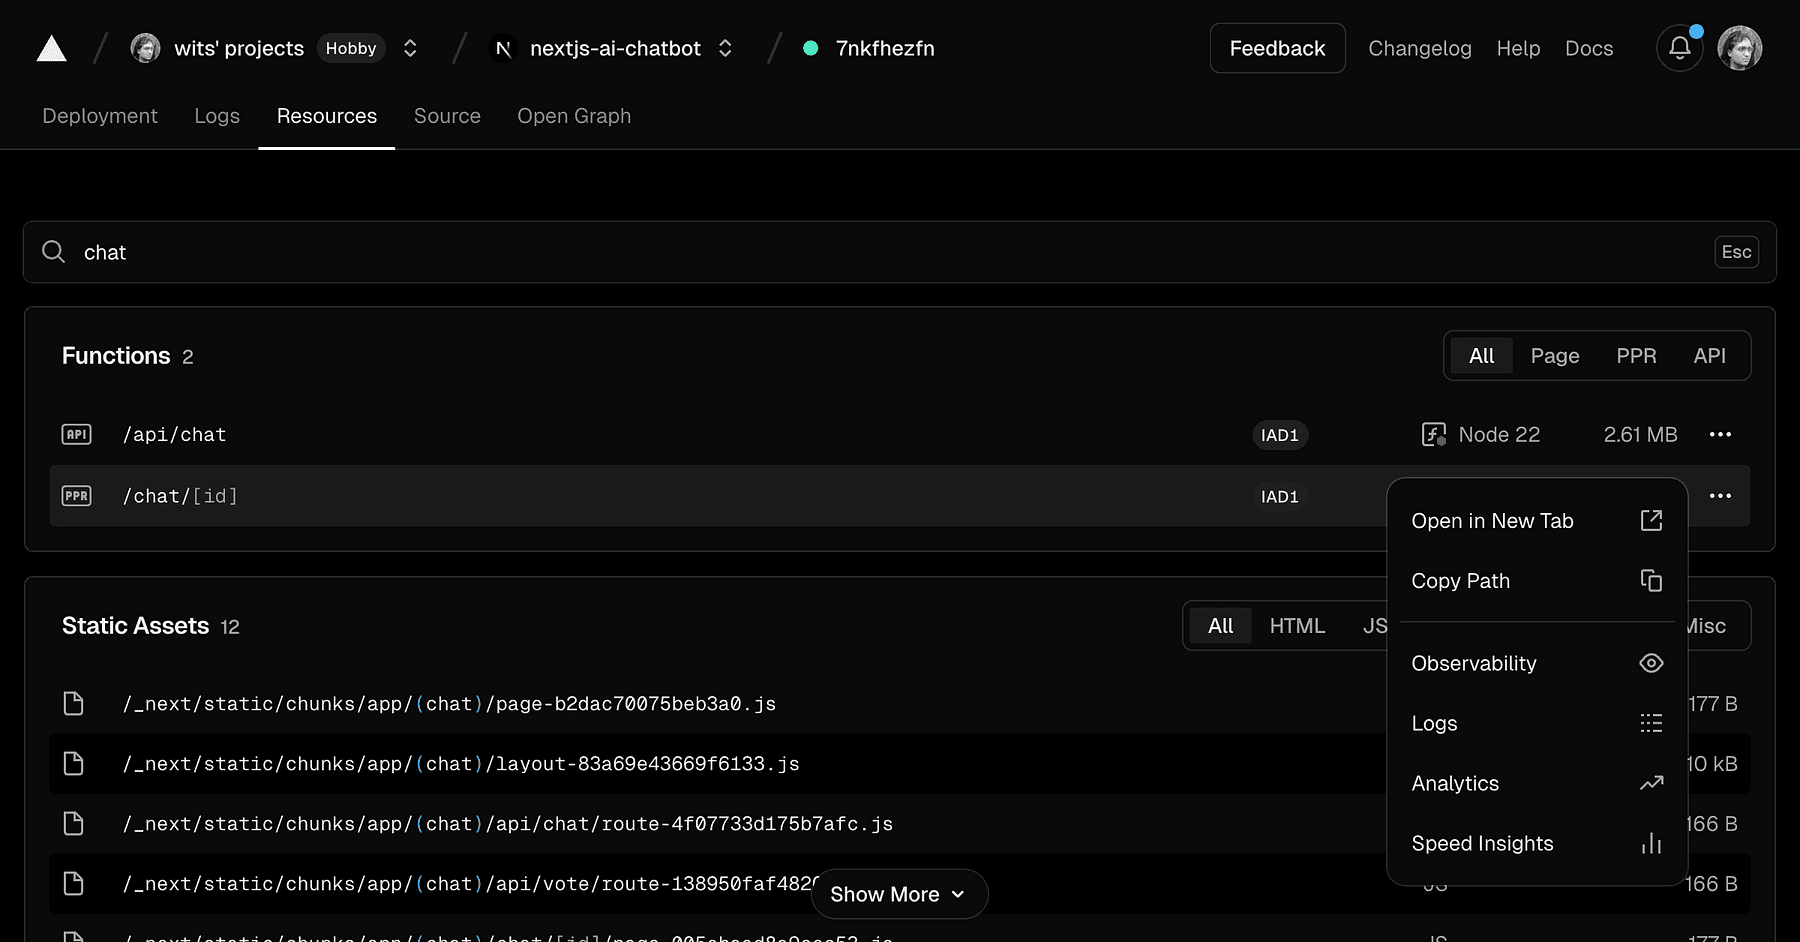
Typically, you connect your GitHub repo to Vercel, and every time you push, it builds and deploys automatically.
For our web app (likely a React/Next.js app generated by v0 or built on Replit), Vercel is ideal.
It handles:
- Builds: runs the necessary build command (like
npm run build). - Serverless functions: If our app has API routes in Next.js or Edge Functions, Vercel deploys those globally, scaling them automatically.
- CDN: Your static assets and pages are served from the edge, meaning fast response worldwide.
- Domain and SSL: you get a default domain and HTTPS out of the box, and you can add your custom domain easily.
- Preview deployments: for every pull request, it gives a unique URL so you can preview changes, extremely useful for testing and sharing with teammates/stakeholders before merging (this ties into “maximizing read time” or rather maximizing feedback loop speed).
For a vibe coder, this means you don’t spend time setting up AWS or fiddling with Nginx, you click deploy and focus on coding new features. A quote from a Vercel blog:
“Vercel lets teams deploy their frontend stupidly easily… deploying with Vercel gives you nice features like deploy previews, functions, analytics, etc.”.
That captures it, it’s almost stupidly easy compared to the old days.
Chances are, if you used v0 by Vercel to generate your UI, it’s already optimized for Vercel deployment (and indeed Vercel encourages you to use their platform). Also, Replit has an integration where you can export to Vercel or directly host on Replit, but for production, Vercel often gives better performance and scalability for frontends.
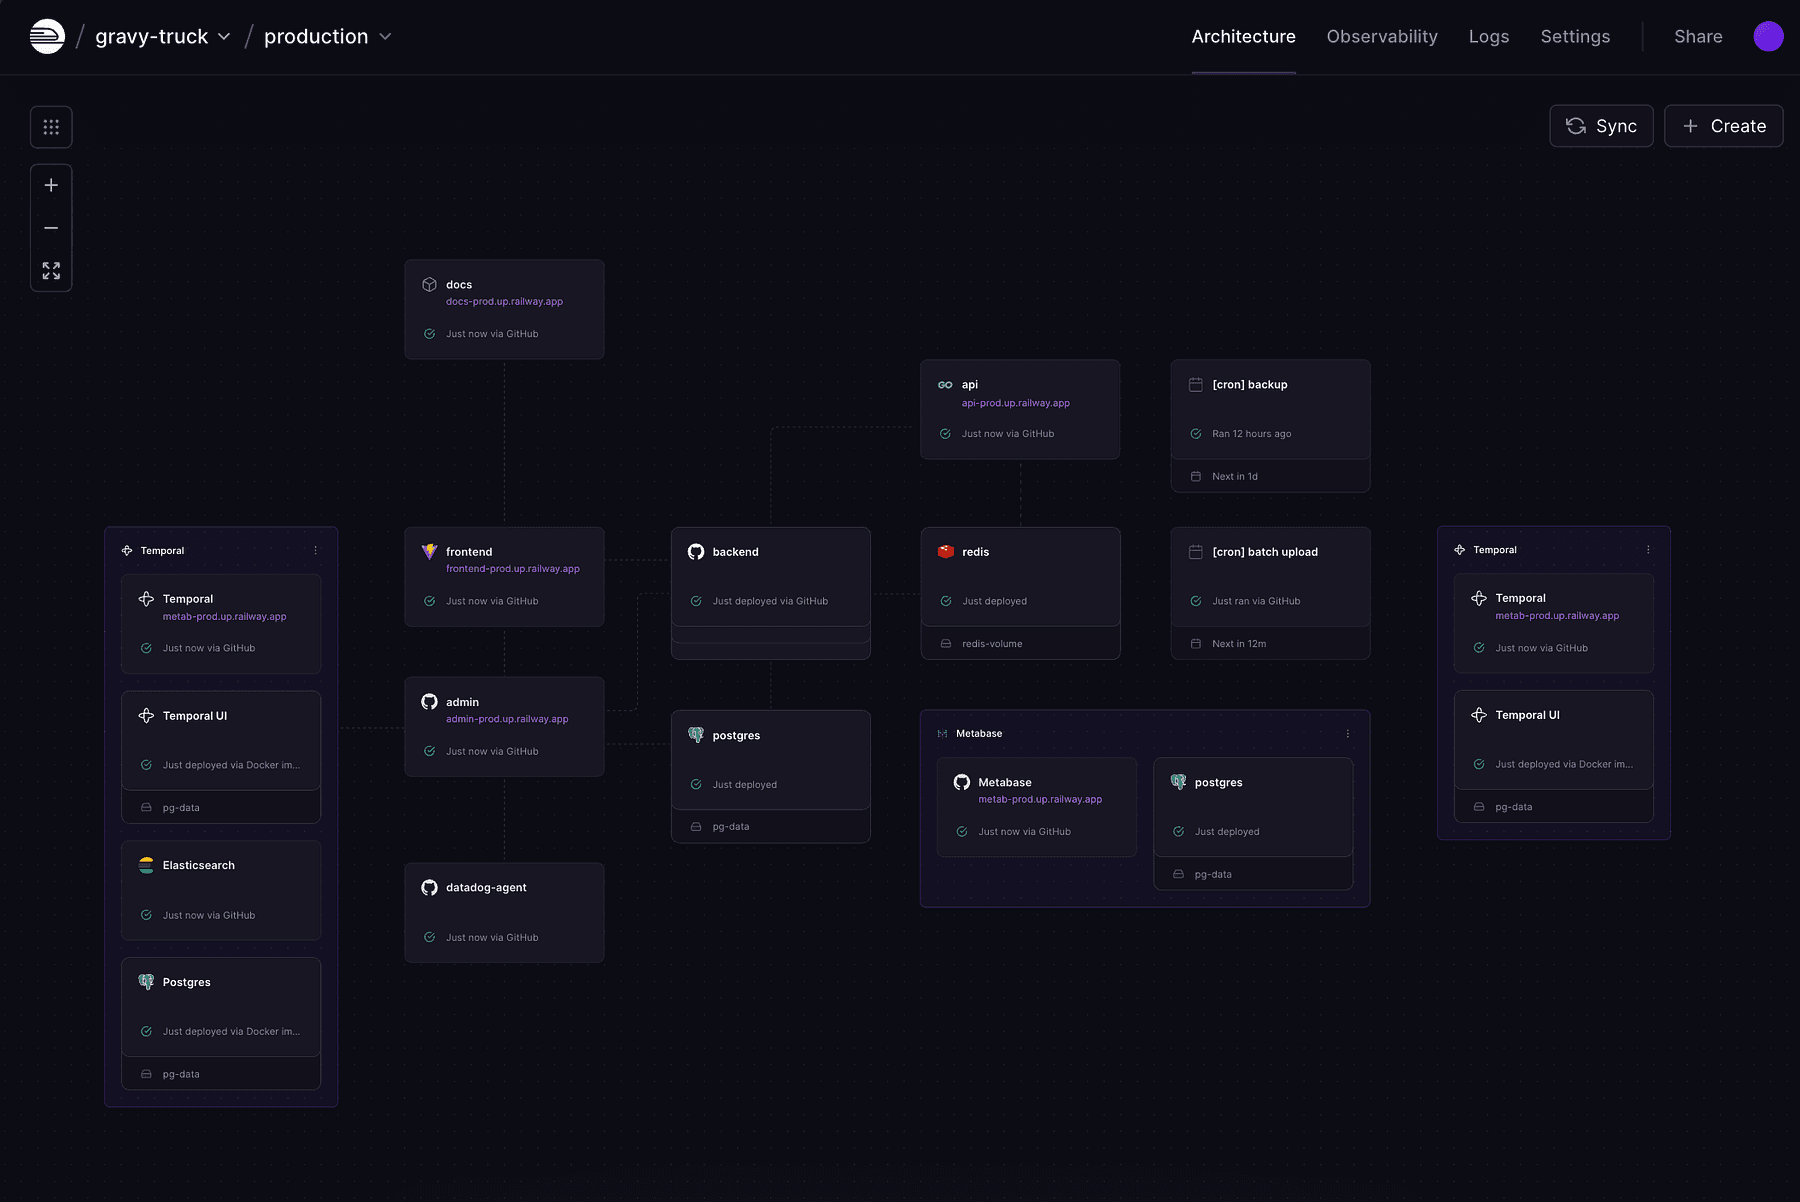
While Vercel is great for frontends and serverless APIs, sometimes you need longer-running backends, databases, or custom services. Railway is like a modern Heroku, an all-in-one cloud platform where you can deploy Docker containers, Node servers, databases, cron jobs, etc., with zero DevOps.
For our stack, Railway complements Vercel by handling things like:
- LlamaIndex service: if we needed a persistent service for RAG (maybe a fast API that uses LlamaIndex to answer queries), we could deploy it on Railway.
- LangGraph backend: any Python or Node backend for our AI agent can run on Railway.
- n8n self-hosted: if we don’t use n8n cloud, we can run n8n in a Docker container on Railway and have our own automation server.
Railway shines in its developer experience.
You can literally take a GitHub repo of a Node.js or Python app, and Railway will detect what it is (via Nixpacks or buildpacks) and deploy it.
It sets up and manages infrastructure for you: provisioning servers, setting ENV variables, etc., with minimal config.
Using Railway often involves just a CLI or web UI: railway up and your service is live at some domain.
It also handles auto-scaling and monitoring.
If your app gets featured and traffic spikes, Railway can scale up more instances (depending on your plan) automatically. It provides logs and metrics in a dashboard so you can see how things are running.
For example, if our AI agent service starts using a lot of memory, Railway’s metrics would show that and we could increase the instance size with a slider.
Compare that to managing EC2 or Kubernetes, Railway is bliss.
In our usage:
- We deploy the web app on Vercel (so
app.habitbuddy.comserved by Vercel). - We keep using Supabase’s hosted service for the database and auth (so we don’t deploy our own Postgres).
- If we built any custom server (say a Python FastAPI for some ML stuff that we didn’t want to do serverless due to performance or a long-running vector DB), we’d put that on Railway.
- Possibly deploy our n8n instance on Railway if needed, accessible at something like
automation.habitbuddy.com. - Deploy any cron jobs or workers on Railway.
Both Vercel and Railway offer generous free tiers too (Vercel hobby plan, Railway free plan) which is nice for starting out.
We only pay when scale or specific needs require it.
Thoughts
By embracing this stack, a solo creator can build and ship an application in days, not months.
For example, our hypothetical HabitBuddy app could be:
- Conceived on Friday (with Perplexity research)
- UI by Saturday morning (v0)
- Web app prototype by Saturday night (Lovable + Replit)
- Mobile app by Sunday (Rork)
- With AI features and automations added along the way (n8n, LangGraph)
- By Sunday evening it’s deployed to production (Vercel/Railway), with a docs site and a basic marketing site up
- Monday, you share it on Reddit or Product Hunt, start getting feedback
This might sound idealistic, but people are indeed building “weekend startups” with such tools.